Defining Applications
Within your schema, you can have one or many applications. While each application in a schema can differ in appearance and functionality, it shares the same underlying object model as other applications in that schema; that is, the object model defined by the schema.
The Application class provides a superclass for all user application instances. Each user application is defined as an instance of the Application class. The
Each time a new schema is defined, an instance of the Application class is created for that schema. When a schema is loaded from a file and there is application data (in the .ddb
If the initialize or finalize method is not set for an application but it is defined in the application or any superclass other than the RootSchema Application class, the Application Browser displays that method in the respective Initialize Method or Finalize Method column of the Application Browser. This enables you to see from the Application Browser the default initialize and finalize methods that will be invoked when running the application.
Double‑clicking on a method name in the Initialize Method or Finalize Method column displays the method source for that method.
The following example shows the Application class node expanded in the Class List of the Class Browser, with the Application Browser and Run Application dialog illustrating the connection between the
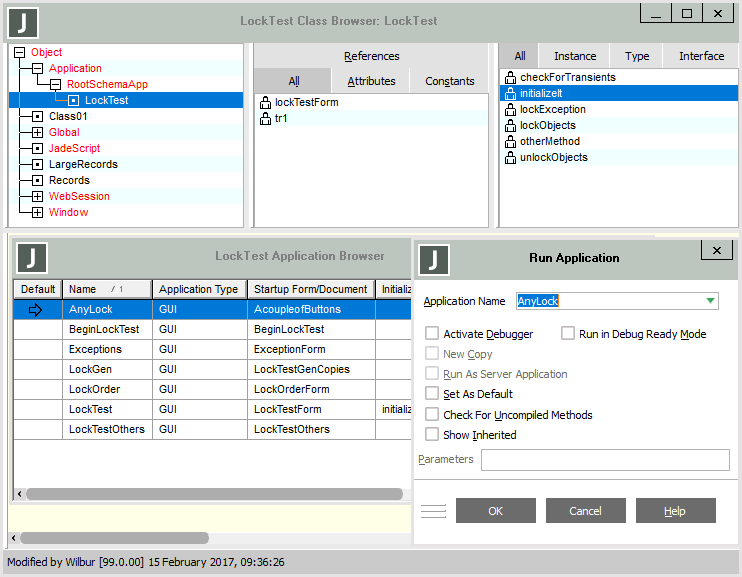
The Application Browser provides a summary of application attributes, which are displayed in a table that has the following columns.
-
Default, with an arrow in the row of the default application.
-
Name, containing the application name.
-
Application Type, containing the application type.
-
Startup Form/Document, containing the name of the startup form, if specified.
-
Initialize Method, containing the name of the application initialize method, if defined.
-
Finalize Method, containing the name of the application finalize method, if defined.
-
About Form, containing the About form of the application, if specified.
-
Web App Type, containing the Web application type; that is, HTML Documents, Web Services, Rest Services, or JADE Forms.
-
Version, containing application version number, if specified, to be displayed in the default About box for the application.
-
Default Locale, containing the default locale to be used when the application is run under a locale that is not supported by the schema of the application.
-
Icon, containing the icon, if specified, to be used for your application instead of the default icon.
-
Font, containing the typeface and attributes, if specified, of the font for the forms in the application to be used instead of the default font.
-
Help File, containing the name and location, if specified, of the application help file.
Right-click in the table on the Application Browser to display the Application menu commands.
Clicking on the heading of a column sorts the table by that value (for example, Application Type). If the column is not the Name column, the table is sorted using the selected column and then the Name column as the second sort column. Clicking on the existing sorted column heading toggles ascending sort order.
Double-click on the name of:
-
The startup form or startup document for an application, to open a new hierarchy browser window for that class.
If you do not have development environment security access to view the class, the request is rejected.
-
An initialize or finalize method for an application, to open a new method source window for that method, to enable you to edit the method.
If you do not have development security access to view the method, the request is rejected. If you do not have change access, any change is rejected.
The LockTest schema shown in this example has user-defined applications, which in the development environment are persistent instances of the Application class. These user-defined applications inherit any constant, property, or method defined in the
View persistent user-defined applications instances by selecting the Classes menu Inspect Instances command or from the Application Browser. View shared transient instances for a node by selecting the Classes menu Inspect Shared Transients command.
To run an application, select the required application in the Run Application dialog. A transient instance of the class is then automatically made available to the run time copy of the application.
To add an application to your current schema
-
Perform one of the following actions to open an Application Browser window.
-
Select the Applications command from the Browse menu
-
Click the Browse Applications toolbar button
-
Press Ctrl+L
The Application Browser is then displayed.
-
-
From the Application menu of the Application Browser, select the Add command.
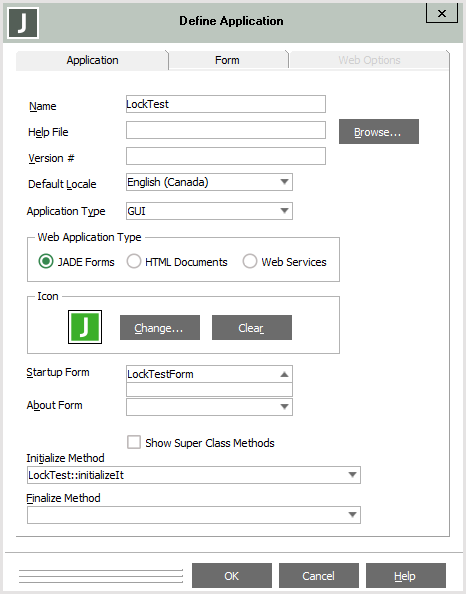
The Application sheet of the Define Application dialog, shown in the following image, is then displayed, to enable you to specify general application details.

-
In the Name text box, specify the name of your new application. An entry in this text box is mandatory. The name must start with an uppercase character and it must be unique to the schema to which you are adding it.
-
In the Help File text box, specify the name and location of the application help file, if required. For example:
c:\jade\testapp.hlp
Use the Browse button to search for your help file, if required. When you click the Browse button, the common File dialog is then displayed, to enable you to select the appropriate file or location. The help file can be an Adobe Acrobat Portable Document Format (.pdf) file, Hypertext Markup Language (.htm or .html) files, a Windows help (.hlp) file, or a compiled help (.chm) file.
If you do not specify a help file in this text box or you do not use the
-
In the Version # text box, specify the application version number, if required.
-
In the Default Locale combo box, select the default locale (language) for your new application, if required. The locales that are listed are those supported by the current schema. If you do not specify a default locale, the current locale is set to the first locale supported by the schema.
When the default locale is set in the JADE development environment, the Locale not supported message box is not displayed in the runtime application.
The default locale is used when the application is run under a locale that is not supported by the schema of the application. The application cannot be run under a locale that is not supported, as no form and string translations will exist. If you try to run an application under a locale that is not supported by the schema, the current locale is set to the application default locale.
-
Use the Application Type combo box to select the type of application that you require, as follows.
-
GUI
The default application type, which provides Windows and print facilities, and so on.
-
GUI, no forms
Specifies a graphical user interface application that has no form display.
-
Non-GUI
Specifies an application that can run in a client node or a server node. The
Alternatively, you can start a non‑GUI application by using the ServerApplication parameter in the [
-
Rest Services
Specifies that the application can be accessed from the Internet, if required. The Web Options sheet is then enabled.
The defined for the application is the first Web page that is displayed when the application is invoked from the Web browser. Application features such as the start-up form, Multiple Document Interface (MDI) forms, and three-dimensional controls are ignored for REST‑enabled applications.
-
Rest Services, Non‑GUI
Specifies that the application can be accessed from the Internet as a background task, if required. The Web Options sheet is then enabled.
Application features such as the start-up form, Multiple Document Interface (MDI) forms, and three-dimensional controls are ignored for REST‑enabled applications. In addition, as applications of type Rest Services, Non‑Gui do not display the Web Application Monitor window, this type of application can be run in the background.
-
Web-enabled
Specifies that the application can be accessed from the Internet, if required. The Web Options sheet is then enabled.
The start-up form defined for the application is the first Web page that is displayed when the application is invoked from the Web browser. Application features such as Multiple Document Interface (MDI) forms and three-dimensional controls are ignored for Web-enabled applications.
-
Web-enabled Non-GUI
Specifies that the application can be accessed from the Internet as a background task, if required. The Web Options sheet is then enabled. The start-up form defined for the application is the first Web page that is displayed when the application is invoked from the Web browser.
Application features such as Multiple Document Interface (MDI) forms and three-dimensional controls are ignored for Web-enabled applications. In addition, as applications of type Web‑Enabled Non‑GUI do not display the Web Application Monitor window, this type of application can be run in the background.
For more details, see the
Applications of type No Forms, Non_GUI, Rest Services, Non‑Gui, and Web‑Enabled Non‑GUI terminate only after the JADE
The
-
-
If you selected the Web‑enabled or Web‑enabled Non‑GUI application type in the previous step, the Web Application Type group box is then enabled. If you do not want to dynamically generate HTML based on JADE forms, select the:
-
HTML Documents option button if you want HTML generated based on HTML documents in your Web application. (For details, see "
-
Web Services option button if you want your application to support Web services. (For details, see "
-
Rest Services option button if you want your application to support REST services. (For details, see "
By default, HTML is dynamically generated in Web applications based on JADE forms; that is, the JADE Forms option button is selected.
-
-
In the Icon group box, click the Change button if you want to display the common File Open dialog, to enable you to select an icon (.ico) file for your JADE application icon display.
-
In the Start-up Form combo box, select the form that is to be displayed when the new application is started.
The first form that you create for the application becomes the default start-up form when you run your application. (For details, see "Adding a New Form", in Chapter 5.)
If your application type is Web‑Enabled or Web‑Enabled Non‑GUI and you do not select or specify a value in this combo box, the HTML Documents sheet on the Web Options sheet is enabled so that you can define an HTML home page.
-
In the About Form combo box, select the form that is to be displayed in response to a user of the runtime application selecting the About command in the Help menu.
-
Check the Show Super Class Methods check box if you want applicable methods from the current schema and all superschemas displayed in the following Initialize Method and Finalize Method combo boxes. When this check box is unchecked, applicable methods from the current schema are displayed in the following combo boxes.
This check box is initially unchecked for a new application definition or when you are changing an application and the Initialize Method and Finalize Method combo boxes are empty or the methods are defined in the current schema. If an application being changed has a defined initialize or finalize method that is defined in another schema, the check box is checked and disabled.
If you check this check box to toggle the checked status, the Initialize Method and Finalize Method combo boxes are reloaded according to the new status.
When you select an initialize or finalize method from a superschema, the check box is disabled so that you cannot uncheck the check box, which would prevent the display of the currently selected method.
-
In the Initialize Method combo box, select the start-up method that is to be invoked when the application is started (for example, the
The Application class initialize method is called automatically if you do not explicitly specify a start-up method in the Initialize Method combo box.
-
In the Finalize Method combo box, select the method that is to be invoked when a close request has been made for your application. This must be a method of the Application class. When the selected
-
Select the Form sheet if you want to specify your form preferences. (For details, see "Specifying Your Form Preferences", in Chapter 5.)
Alternatively, perform one of the following actions.
-
Select the Web Options sheet if you want to specify your options for JADE applications accessed from the Internet. For details, see "
-
Click the OK button.
-
Your specified application is then created as an instance of the
Only one Application Browser for the current schema can be open at any time. If an Application Browser is already open for that schema, it is brought to the top when you click the Browse Application toolbar button or you select the Applications command from the Browse menu.
You can have concurrent open Application Browsers for different schemas in the current development environment session.

