Defining a Web Services Provider Application
You can enable your JADE application for Web services when you first define your application or you can access the Define Application dialog at any time to enable Web service access or to maintain your application preferences.
You can override Web application options that you define in the Define Application dialog at the Web services class level, if required.
For details about generating WSDL, see "Generating Web Services Description Language (WSDL)", later in this section.
For more details about the Define Application dialog, see "
To access the Web Options sheet of the Define Application dialog
-
Perform one of the following actions to open an Application Browser window.
-
Click the Browse Applications button from the browse toolbar
-
Select the Applications command from the Browse menu, or press Ctrl+L
-
-
From the Application menu of the Application Browser, select the Add command to add a new application to your current schema or the Change command to enable Web services access or to maintain the preferences of your current application.
The Application sheet of the Define Application dialog is then displayed.
-
Select the Web-Enabled or Web-Enabled Non-GUI option in the Application Type combo box, to specify that the application can be accessed from the Web using an HTML thin client.
The Web Application Type group box and the Web Options sheet are then enabled.
-
In the Web Application Type group box, select the Web Services option button.
-
Click the tab of the Web Options sheet.
Now that you have enabled your application for Web services, you can specify your access options.
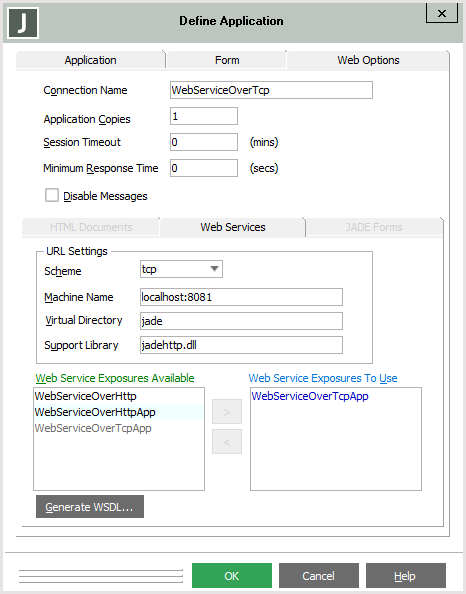
The Web Options sheet, shown in the following image, is then displayed.

-
If you are defining an application for direct Web services, select the tcp value in the Scheme combo box.
As the tcp value applies only to direct Web services, retain the default http communication protocol value for all other Web service types.
The TCP protocol for direct Web services communication works only between JADE systems.
-
In the Machine Name text box, specify the machine name or Internet Protocol (IP) address to which the Web service requests should be directed.
For direct Web services, the machine name must contain the machine name or the IP address followed by a colon (:) character then by a TCP port number on which this service is offered.
-
In the Virtual Directory text box, specify the virtual directory where the jadehttp module resides (as defined in IIS or Apache).
For details, see "
-
In the Web Service Exposures Available list box, select the Web service exposure for this application, and then click the right arrow (>) button to move it to the Web Service Exposures to Use list box. The Generate WSDL button is then enabled. Alternatively, double‑click on an exposure in one list to move it to the other list.
You must select one or more Web service exposures.
When you resize the Define Application dialog, the Web service exposure list boxes are resized and repositioned to make use of the extra space. For details about defining a Web service exposure, see "Using the Web Service Exposure Wizard", earlier in this chapter.
-
Click the Generate WSDL button. For more details, see the following subsection.
If you want to restrict the number of Web service applications, you can set the
When you set this parameter to true, an application cannot be started when the port limit is exceeded, and a message is output to the jommsg.log file.

