Extracting Data from the JADE Database
When the RPS node data store is configured or created with the Full or Mapping Extent persistent database modes, you can extract the data on the RPS node before loading it into the target RDBMS database. (For details about selecting the database mode, see "Creating the RPS Database", earlier in this chapter.)
If you created the database in the Working Set mode that is deprecated in JADE 2020 and higher, you must extract the data from the primary database.
The extract process creates the bulkInsert.sql file (containing the Data Definition Language (DDL) for loading extracted data) and the data files.
If the extract is done via the RPS Manager on the SDS node, the user-defined Datapump application must be specified in the
When extracting data, you can override the names of files created by the extract process, including the names of the script file itself, and you can split a data file into two or more partitions, to support the parallel loading of large tables.
The
For details about extracting data or starting the extract process programmatically, see the extract data-related methods in "Calling the RPS Manager from a Web Service Consumer", later in this chapter, or the
To extract data from your persistent data store
-
Select the Extract command from the Extracts menu. The Extract command is disabled on an RPS node when the RPS Datapump application is running.
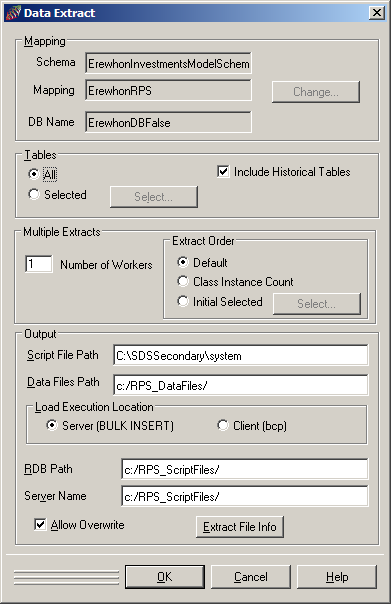
The Data Extract dialog, shown in the following image, is displayed.

On a primary, the Change button in the Mapping group box is enabled so that you can select another schema, RPS mapping, and database name defined in that schema or another RPS mapping in the displayed schema, if required.
If you require a user-defined Datapump application, the data must be extracted on the RPS node.
-
If you want to include data from historical tables, check the Include Historical Tables check box in the Tables group box. By default, the Include Historical Tables check box is unchecked.
-
If you want to extract selected tables only, select the Selected option button in the Tables group box and click the Select button that is then enabled.
The RPS Table Selection dialog is then displayed. For details, see "Selecting Tables", later in this chapter.
If the Include Historical Tables check box is not checked, historical table names are disabled and cannot be selected for inclusion.
-
If you want to initiate multiple data extract worker processes, perform the following actions in the Multiple Extracts group box.
-
In the Number of Workers text box, specify the number of multiple worker processes you require.
-
The worker allocation strategy for multiple worker processes is as follows.
-
Default value
-
By class extent size (that is, the Class Instance Count option)
-
Selected tables first (that is, the Initial Selected option)
When you select the Initial Selected option button, you can click the Select button to display the RPS Table Selection dialog, which enables you to select the tables that you want extracted first and the order in which the selected files are extracted. You can select as many tables as you require. Tables that you do not select are processed in default order. For details, see "Selecting Tables", later in this chapter.
-
-
-
In the Output group box, perform the following actions.
-
In the Script File Path text box, specify the path of the directory to which the load script is to be created.
The directory must be valid on the server. If it does not exist, it is created.
-
In the Data Files Path text box, specify the path of the directory to which the generated data files are to be extracted. The directory must be valid on the server. If it does not exist, it is created.
-
In the Load Execution Location group box, select the Client (bcp) option button if the RPS node is executing on a different machine to the RDB server and sharing disk is not feasible.
The Server (BULK INSERT) option is selected by default. For more details about load execution locations, see step 10 under "Configuring your RPS Node", earlier in this chapter.
Using client execution is slower than the server execution.
If the connection to the RDBMS node requires a user name and password, the password must be included in the BCP command file as a parameter to the BCP command.
-
For Server load execution, in the RDB Path text box, specify the absolute path of the directory to which the data is extracted from the relational database server perspective. The load script file name defaults to bulkInsert.sql. The bulkInsert.sql script includes the RDB path on which the data files are located on the RDBMS server (that is, where the script file is executed). The Data Files Path and RDB Path values are the same if the RDBMS server node is the same as the JADE RPS node.
-
For Server load execution if you want to use the SQL Server sqlcmd utility to execute the script, in the Server Name text box, enter the name of the SQL server to which to connect. If you do not enter a value in this text box, the script is executed using the ODBC interface.
For Client load execution, in the Server Name text box, enter the name of the RDB server for connection. The load command file name defaults to bulkinsertbcp.cmd. The output of the BCP command is piped to the bcpoutput.log file in the directory where the BCP command file is located.
The sqlcmd utility is normally installed as part of SQL Server. If the utility is not available, do not enter a value in this text box.
If sqlcmd is used, the output of the script is saved in a script-name.log file in the directory in which the script is found. The output includes the echoed input and any information or error messages output.
If the script fails, an invalid error result is returned and the error is reported to you if you are using the RPS Manager and it is recorded in the jommsg.log file.
The advantages of using the sqlcmd option are as follows.
-
Error results, which are lost when using the ODBC interface, are correctly reported.
-
The error information from SQL Server is saved in the log file.
-
-
If you want existing bulk insert extract files overwritten, check the Allow Overwrite check box.
As extract files are not overwritten by default, the extract process fails if files exist in the output directory.
-
Click the Extract File Info button if you want to:
-
Override the names of files created by the extract process, including the names of the script file itself.
-
Split a data file into two or more partitions, to support the parallel loading of large tables.
For details, see "Maintaining Extract File Names", later in this chapter.
-
-
Click the OK button. Alternatively, click the Cancel button to abandon your selections.
The Jade RPS Manager window displays the progress of the extract process and its completion.
The extract script, bulk load definition files, and bulk load data files for the selected RPS mapping are then created in the specified directory.
By default, the file is extracted to the extract directory or the script file path, if specified, or to the script path on the RPS node specified in the Alter Script Path text box on the Configure RPS Node dialog.

