Configuring your RPS Node
You can configure an RPS node only when the Datapump application is not running.
To configure the RPS node on a secondary RPS system
-
Select the RPS Node Configuration command from the File menu.
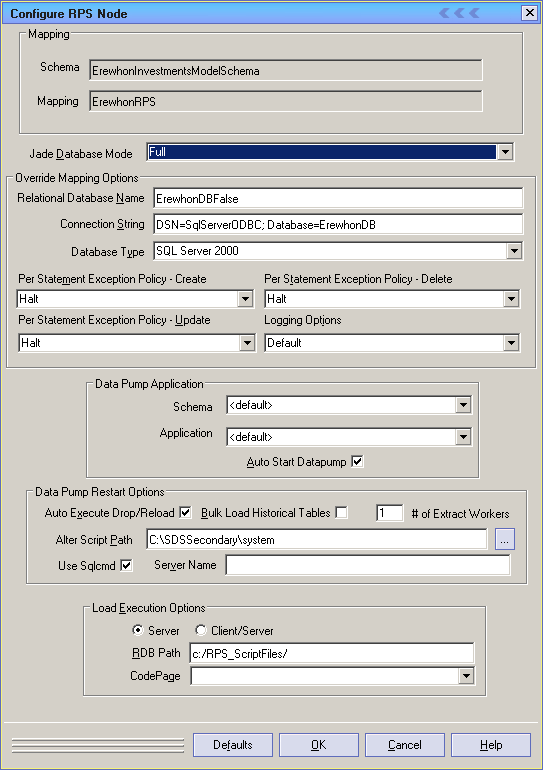
The Configure RPS Node dialog, shown in the following image, is then displayed.

The Schema and Mapping text boxes in the Mapping group box display the schema and mapping for which the RPS data store was created. As these values are read-only, you cannot change them.
-
The Jade Database Mode combo box displays the mode in which the RPS data store was created. It also enables you to change the database mode. You can change Full mode to Mapped Extent. (The Working Set mode is deprecated in JADE 2020 and higher.)
-
The default values in the Override Mapping Options group box are the values defined on the Define RPS sheet of the Relational Population Service wizard. (For details, see "
To override any default mapping values that you require:
-
Specify the name of the target RDBMS database in the Relational Database Name text box. If you do not specify the target RDBMS database, an RDBMS error may occur when you attempt to execute the generated SQL scripts.
-
Specify the connection string for the RPS node, in the Connection String text box. A connection string for an SQL Server connection contains ODBC DSN information to the RDBMS database; for example:
DSN=SQLServer2005;Database=Rps
For SQL Server, the Database=relational-database-name value must be specified in the Configure RPS Node dialog only if your ODBC Data Source Name (DSN) does not specify a database. Other DSNs may require other options.
-
If you want to specify a different database type for the node, select the type that you require in the Database Type combo box.
If you select a database type that differs from that in the RPS mapping and the database already exists with a different type, an alter script is generated and run to modify the appropriate columns, as required
-
Select the Alternative Action option from the Per Statement Exception Policy – Create combo box list if you want an alternative update action performed when an RDBMS error occurs on a create row.
Select the Halt option if you want the Datapump application to halt when the RDBMS error occurs on a create row.
-
Select the Alternative Action option from the Per Statement Exception Policy – Delete combo box list if you want an alternative ignore action performed when an RDBMS error occurs on a delete row.
Select the Halt option if you want the Datapump application to halt when the RDBMS error occurs on a delete row.
-
Select the Alternative Action option from the Per Statement Exception Policy – Update combo box list if you want an alternative create action performed when an RDBMS error occurs on an update row.
Select the Halt option if you want the Datapump application to halt when the RDBMS error occurs on an update row.
-
Select the RPS Table option from the Logging Options combo box list if you want any RDBMS errors that occur logged in the RPS table.
Select the Default option if you want RDBMS errors output only to the jommsg.log file.
-
-
If you want to specify your own non-GUI Datapump application, select that schema and application in the corresponding Schema and Application combo boxes in the Data Pump Application group box.
The default value (<default>) indicates the RootSchema JadeRpsDataPump application is run on the RPS node from the schema in which the RPS mapping is defined. For details about specifying your own data pump application, see "RPS Datapump Application", earlier in this chapter.
-
Check the Auto Start Datapump check box in the Data Pump Application group box if you want to automatically start the Datapump application when the RPS node is started. By default, this check box is unchecked, indicating that the Datapump application must be started from the RPS Manager. (See also "Restarting the Datapump Application", earlier in this chapter.)
-
In the Data Pump Restart Options group box:
-
Check the Auto Execute Drop/Reload check box if you want to restart the Datapump application automatically start the Datapump application after a reorganization to run the Drop/Reload alter script to rename and recreate any tables (as required) and then extract and load the data for these tables.
By default, this check box is unchecked, indicating that the Drop/Reload scripts are not automatically executed and it is the responsibility of your RDBMS administrator to apply the required changes before restarting the Datapump application.
-
If you checked the Auto Execute Drop/Reload check box in the previous step, check the Bulk Load Historical Tables check box if you want to load data for historical tables when reloading data into the RDBMS. All automatic loads (when setting up the RDBMS and reorganization reloads) then include data for historical tables. See also "Alter Scripts", earlier in this chapter.
By default, the Bulk Load Historical Tables check box is unchecked.
-
If you want to initiate multiple data extract worker processes on automatic extracts, specify the required number in the # of Extract Workers text box.
-
In the Alter Script Path text box, specify the directory on the JADE RPS server node to be used for update scripts generated during reorganizations.
The alter script path defaults to the JADE database path. This path must be set if you checked the Auto Start Datapump check box in step 5 of this instruction or you selected the Create Tables command from the RPS menu on an RPS secondary system.
If you are unsure of your file directory, click the adjacent Browse button to access the common Browse for Directory selection dialog that enables you to select the auto script path.
-
If you do not want to use the sqlcmd utility to execute SQL scripts, including alter scripts and server bulk load scripts, uncheck the Use Sqlcmd check box. By default, the Use Sqlcmd check box is checked.
The sqlcmd utility must be installed on the machine that hosts the RPS node. If it is not installed for any reason, we recommend that you obtain the standalone installation package for the sqlcmd utility from the Microsoft download site and use that to install sqlcmd. If you do not enter a value in this text box, the script is executed using the ODBC interface.
If you use sqlcmd to execute SQL scripts, including alter scripts and server bulk load scripts, the output of the script is saved in a script-name.log file in the directory in which the script is found. The output includes the echoed input and any information or error messages output. If the script fails, an invalid error result is returned and the error is reported to you if you are using the RPS Manager and it is recorded in the jommsg.log file.
The advantages of using the sqlcmd option are as follows.
-
Error results, which are lost when using the ODBC interface, are correctly reported.
-
The error information from SQL Server is saved in the log file.
-
-
Specify the name of the SQL server instance in the Server Name text box.
-
-
If you are using auto extracts, set the values in the Load Execution Options group box.
-
For server execution (the default):
-
The RPS node and the RDBMS server must have shared access to a disk directory, as RPS uses the default BULK INSERT process to load data into the RDB for SQL Server execution.
The extract files are written to the alter script path directory from the RPS node. The load function is started from the RPS node but executes (reads the files and loads the data into RDB) on the RDBMS server.
-
In the RDB Path text box, specify the absolute path of the alter script path directory to which the data is extracted from the relational database server perspective.
The load script file name defaults to bulkInsert.sql.
-
-
For client execution, if the RPS node is executing on a different machine to the RDB server and sharing disk is not desired, select the Client/Server option button in the Load Execution Location group box.
RPS uses the Bulk Copy Program (BCP) so that the load can run from directories on the RPS node. The extract files are written to the Alter Script Path directory (specified in step 5 of this instruction) from the RPS node, the load function is started and executed on the RPS node, the files are read on the RPS node, and the data is sent to the RDBMS using a client/server connection (which runs BCP in the RPS node for SQL Server).
Using client execution is slower than the server execution.
If the connection to the RDBMS node requires a user name and password, the password must be included in the BCP command file as a parameter to the BCP command.
The load command file name defaults to bulkinsertbcp.cmd. The output of the BCP command is piped to the bcpoutput.log file in the directory where the BCP command file is located.
-
If you want to specify the code page to be used for loading extracted data, select the required code page in the CodePage combo box.
-
-
If you want to reset the default values in controls in the Override Mapping Options group box to the values specified in the RPS mapping, click the Defaults button.
-
Click the OK button. Alternatively, click the Cancel button to abandon your selections.