Setting Up the RPS Options
The Define RPS sheet of the Relational Population Service wizard, shown in the following image, enables you to define the name of your new RPS mapping and default connection information.
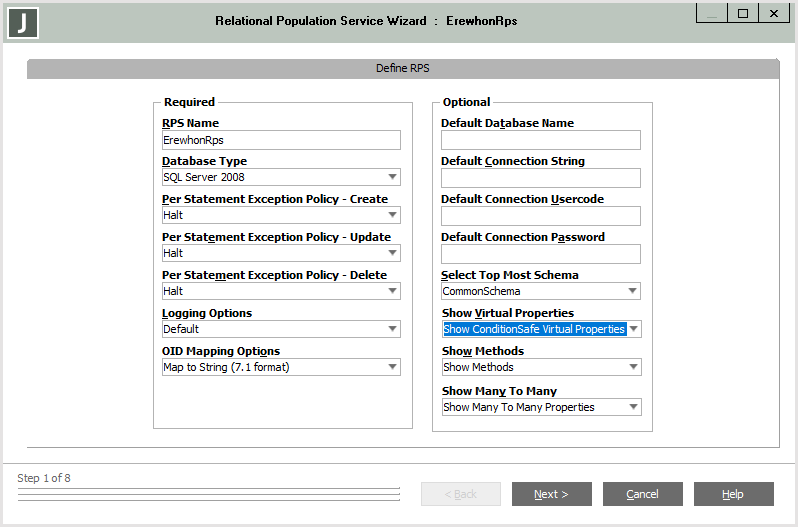
With the exception of defining a name, this information has default values or is optional.
To set up your RPS mapping options
-
In the Required group box, specify the following mandatory values.
-
In the RPS Name text box, specify the name of your new RPS mapping.
-
In the Database Type combo box, select the database type that the RPS mapping is targeting. The available database types are SQL Server 2008 (the default), SQL Server 2005, and SQL Server 2000. Select SQL Server 2008 if you are targeting SQL Server 2012, SQL Server 2014, or SQL Server 2016.
-
Select the required action in the Per Statement Exception Policy – Create combo box. By default, the Halt value is selected, which aborts the transaction and ceases database tracking when a statement creation exception is raised.
Select the Alternative Action value if you want the create action to be attempted as an update if the create action fails. (For more details, see "
-
Select the required action in the Per Statement Exception Policy – Update combo box. By default, the Halt value is selected, which aborts the transaction and ceases database tracking when a statement update exception is raised.
Select the Alternative Action value if you want the update action to be attempted as an insert if the update action fails. (For more details, see "
-
Select the required action in the Per Statement Exception Policy – Delete combo box. By default, the Halt value is selected, which aborts the transaction and ceases database tracking when a statement deletion exception is raised.
Select the Alternative Action value if you want the deletion errors to be ignored. (For more details, see "
-
Select the RPSTable list item in the Logging Options combo box if you want create, update, or delete statement exception information recorded in a table in the relational database.
By default, statement exceptions are logged only to the jommsg.log file. (For details, see "
-
Select the required object identifier (oid) mapping in the OID Mapping Options combo box. (For details, see "
-
-
In the Optional group box, specify the following default connection options, if required.
-
In the Default Database Name text box, specify the default name of the target relational database.
If specified, the name is used when creating the relational table definitions and data load data to load into the correct database. If you do not specify a default database name, the user must specify it when the table definition or data are extracted.
-
In the Default Connection String text box, specify the default connection string to the target database server from your RPS mapping.
For SQL Server, this is the ODBC connection string, including the ODBC DSN name, required for the RPS node; for example:
DSN=SqlServerODBC; Database=MyDatabase
-
In the Default Connection Usercode text box, specify the default connection user code to be used to be used on the RPS node to connect to the relational database.
-
In the Default Connection Password text box, specify the default connection password to be used on the RPS node to connect to the relational database.
Passwords specified in the Relational Population Service wizard are extracted unencrypted in form and data definition (.ddb
-
In the Select Top Most Schema combo box, select the highest-level superschema whose objects you want to include in the RPS mapping if you do not want to create the mapping from objects only in the current schema.
-
If you want all virtual properties displayed in the Relational Population Service wizard, select the Show Virtual Properties list item in the Show Virtual Properties combo box. Alternatively, if you want only condition-safe virtual properties (that is, they have the
-
If you want methods displayed in the Features pane on the Select Columns for Tables sheet of the Relational Population Service wizard, select the Show Methods list item in the Show Methods combo box.
By default, column-mapping methods (that is, methods defined in a class that have no parameters on the class, return a primitive type or a non-exclusive object reference, and that are not updating) are not displayed. See also "Toggling the Display of Methods" under "Selecting Columns for Tables", later in this chapter.
-
If you want to select the collections to be mapped to junction tables on the Many To Many Table Selection sheet of the Relational Population Service wizard, select the Many To Many Properties list item in the Show Many To Many combo box. See also "Adding Many-to-Many Relationships to an RPS Mapping" and "Mapping Many-to-Many Relationships", later in this chapter.
-

