Creating the RPS Database
The Create RPS Database command in the RPS menu on the primary server provides submenu items that enable you to select the Full and Mapped Extent storage modes for the initial RPS data store being created. Select the:
-
Full value if you want to replicate all persistent system and user schema files in the RPS data store. As this database is structurally equivalent to an SDS secondary database, it can be used as an emergency database backup.
-
Mapped Extent value if you want to replicate only persistent system and user schema database files that contain classes included in the RPS mapping. When a JADE database file is replicated, the entire file is replicated and not just the objects in the mapped extent.
Select the directory in which the data is stored.
For details about database storage modes and the benefits of both modes, see "RPS Data Store", earlier in this chapter.
To create the data store for an RPS node on a primary server
-
Select the Create RPS Database command from the RPS menu.
-
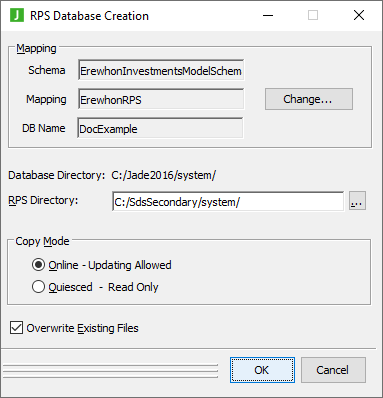
Select the required storage mode from the submenu that is then displayed. The RPS Database Creation dialog, shown in the following image, is then displayed.

-
If you want to change the schema, RPS mapping, or database name, click the Change button. The Select RPS Mapping dialog is then displayed, so that you can select the RPS schema, mapping, and database name that you require.
For details, see "Selecting Your RPS Mapping", earlier in this chapter.
-
In the RPS Directory text box, specify the path of the directory in which the data store is to be created. You must specify a directory that is valid on the server. If it does not exist, it is created.
Alternatively, click the adjacent browse button (indicated by the … points of ellipsis symbol) to display the common Browse for Folder dialog that enables the selection of the RPS data store directory in which the data files are created.
-
In the Copy Mode group box, select the Quiesced – Read Only option button if you want a quiesced read‑only data store creation operation. When you select this option, the database is placed in a quiescent read‑only state while the data is copied into the RPS data store. For details, see "
By default, the Online - Updating Allowed option is selected, indicating that updates are allowed while the data is copied. For details, see "
-
Check the Overwrite Existing Files check box to allow any existing files in the specified destination RPS data store directory to be overwritten as the data is copied from the JADE database if the RPS mapping permitted this.
By default, existing files are not overwritten.
-
Click the OK button. Alternatively, click the Cancel button to abandon your selections.
When the data store creation completes successfully, the RPS Database Create Completed Successfully message box is then displayed advising you of this and the location of the log file that contains details of the operation. Click the OK button to return focus to the Jade RPS Manager window.
For details about creating an RPS node from a quiesced or offline backup of the primary, see "Creating an RPS Database from a Quiesced or Offline Backup of the Primary", later in this chapter.
The

