Using the Common Sheet
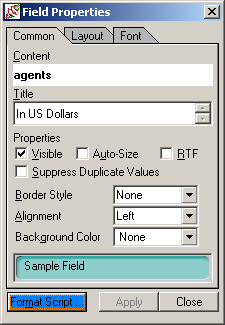
The Common sheet of the Field Properties dialog, shown in the following image, is displayed by default when your first access the dialog.
To change the properties on the Common sheet of the Field Properties dialog
-
For literal report fields only, change the value of the literal by overwriting the value in the Content text box at the top of the sheet.
To break the current line and begin a new line while you are entering your text, press Ctrl+Enter. A carriage return is inserted and the caret is moved to the beginning of new line underneath the existing text line.
The Content text box is enabled only for literal report fields. For all other report fields, this text box displays the field description that is automatically derived from the database name and which cannot be changed by using this dialog.
-
In the Title text box (which is not visible for literal report fields), enter one of the following values.
-
The page heading value for a linked header field.
To specify that you want linked headers, use the Details sheet of the Report Properties dialog. For details, see "Using the Details Sheet" under "Setting Report Properties", earlier in this chapter.
-
The tag field, when you extract to an XML file.
For details about extracting to an XML file, see "Using the Output Sheet" under "Setting Report Properties", earlier in this chapter.
-
-
Uncheck the Visible check box if you do not want your report field to be visible on your report. Report fields are visible by default; that is, the Visible check box is checked.
-
If you want the JADE Report Writer Designer application to resize your field if the contents are too large to fit into the field, check the Auto-Size check box.
Any time that the content of your report field is longer than the field width when you check this check box, the field height is automatically increased to enable all field data to be printed with word wrapping (that is, your text wraps to the next line when it reaches the right of the field).
This check box is not checked by default.
-
Check the RTF check box to display RTF strings as formatted text in your report.
This check box is enabled only for string fields. If your database supports RTF, string fields are interpreted and displayed as formatted text when this option is checked.
-
Check the Suppress Duplicate Values check box if you want the JADE Report Writer Designer application to suppress the printing of this report field if it has the same value in the frame that is printed immediately before the current frame.
This check box is not checked by default; that is, the report field is printed regardless of any duplication.
-
Select a border style from the Border Style list box. The default value is None, indicating that no border is printed.
Click the Single option to create a single line border around your report field.
-
Select an alignment option from the Alignment list box.
To align the content of the report field within the boundaries of the report field, select the Left, Right, or Center option.
By default, the field is aligned according to the default report field alignment specified in the Report Properties dialog. For details, see "Using the Details Sheet" under "Setting Report Properties", earlier in this chapter.
You can also change the alignment by using the sample that is shown in the green sample text box below the Alignment list box. Click to the left or right of the sample to change the alignment.
-
Select a field background color from the Background Color list box. The field background color is applied only to the selected text field. Background color does not apply to pictures.
If you select the Custom color, the common Color dialog is displayed to enable you to select or define a custom color. When you have made your selection, click the OK button to apply the selected color or click the Cancel button to close the Color dialog without making any changes.
If you select None, no background color is set; that is, the field background is transparent so that the frame background color is printed. This is the default field background color option.
-
Click the Format Script button to define field format scripts. The Format Scripts dialog is then displayed. If a format script exists for the current field, the button is blue. If no script exists, the button is gray. For more details, see "Setting Field Properties using a Format Script", later in this section.
-
Click another tab if you want to make changes on other sheets of the Field Properties dialog.
-
Click the Apply button to apply the changes that you have made or click the Close button to close the Field Properties dialog.
To save the recent changes when you close the dialog, you must click the Apply button immediately prior to closing the dialog. To abandon any changes that you have made but not yet applied, do not click the Apply button immediately prior to clicking the Close button.

