Using the Output Sheet
Use the Output sheet of the Report Properties dialog to set options that apply to data extract files. You can extract data files in the following formats.
-
HTML (HyperText Markup Language)
-
Delimiter-separated file
-
Text
-
RTF (Rich Text Format)
-
XML (Extensible Markup Language)
The Output sheet enables you to set options relating to each extract file format.
For details about extracting data files, see "Extract Data" under "File Menu", later in this chapter.
To access the Output sheet of the Report Properties dialog
-
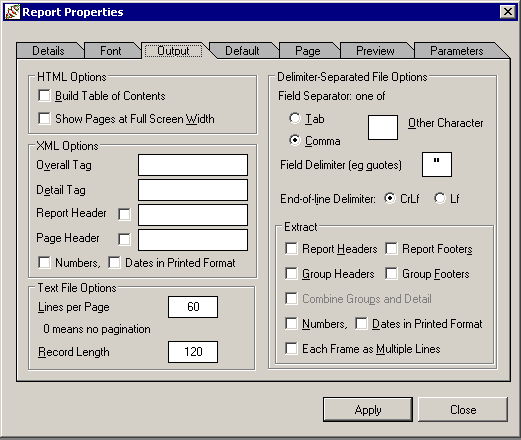
Click the Output tab of the Report Properties dialog.
The Output sheet, shown in the following image, is then displayed.
To set HTML output options in the HTML Options group box
-
If your report has one or more Group sections, check the Build Table of Contents check box to build a table of contents.
The resulting HTML specifies two frames. The frame on the left displays the group heading values and the frame on the right displays the report text. Each group heading provides a hyperlink jump to the equivalent group heading location within the report text.
-
Check the Show Pages at Full Screen Width check box to produce full-screen HTML pages regardless of the screen resolution.
As full-screen HTML pages are not produced regardless of the screen resolution by default, HTML pages are built with horizontal positioning in pixels and the page width is consequently the same as the current printer page width.
-
Click another tab if you want to make changes on other sheets of the Report Properties dialog.
-
Click the Apply button to apply the changes you have made or click the Close button to close the Report Properties dialog.
To save the recent changes when you close the dialog, you must click the Apply button immediately prior to closing the dialog. To abandon any changes that you have made but not yet applied, do not click the Apply button immediately prior to clicking the Close button.
To set XML output options in the XML Options group box
-
In the Overall Tag text box, enter the value for the highest-level XML tag around the rest of the extracted data; for example, if the value of the tag in the Overall Tag text box is report:
<report>
...   report data
</report>
-
In the Detail Tag text box, enter the tag for the parent element of the elements corresponding to the fields in the detail section; for example, if the value of the tag in the Detail Tag text box is detail:
<detail>
   <name> Peter Smallsmith </name>
   <address>645 Gregan Road</address>
</detail>
Group fields are written with the group alias as the tag.
-
Check the Report Header check box to include the report headers in the XML output. If the check box is checked, you must enter a value for the tag of the parent element of the elements corresponding to the fields in the report header section in the Report Header text box.
-
Check the Page Header check box to include the page headers in the XML output. If the check box is checked, you must enter a value for the tag of the parent element of the elements corresponding to the fields in the page header section in the Page Header text box.
-
Check the Numbers in Printed Format check box to extract numbers as strings formatted in the same way as they are printed. By default, this check box is not checked, indicating that numbers are extracted as numeric values.
-
Check the Dates in Printed Format check box to extract dates as strings formatted in the same way as they are printed. By default, this check box is not checked, indicating that dates are extracted in the standard format.
-
Click another tab if you want to make changes on other sheets of the Report Properties dialog.
-
Click the Apply button to apply the changes you have made or click the Close button to close the Report Properties dialog.
To save the recent changes when you close the dialog, you must click the Apply button immediately prior to closing the dialog.
To abandon any changes that you have made but not yet applied, do not click the Apply button immediately prior to clicking the Close button.
To set delimiter-separated file output options in the Delimiter-Separated File Options group box
-
Select one of the following field separator options under Field Separator: one of.
-
To set the field delimiter as a tab character, select the Tab option button.
-
To set the field delimiter as a comma character (,), select the Comma option button.
-
To set your own delimiter character, enter a field delimiter character in the Other Character text box.
The default field separator value is the comma character (,).
-
-
In the Field Delimiter text box, enter the delimiter character for a non-numeric field. The default field delimiter value is the quotes character (").
-
Specify the end-of-line delimiter by selecting the CrLf or Lf option button next to End-of-line Delimiter. The default end-of line delimiter value is CrLf.
The standard file end-of-line delimiter is a Cr (carriage return) followed by an Lf character.
- In the Extract group box, select options for the report data to be included in the extract file.
-
To extract data from report headers and include this data in the extracted file, check the Report Headers check box. By default, this check box is not checked, indicating that report header detail is not extracted.
-
To extract data from report footers and include this data in the extracted file, check the Report Footers check box. By default, this check box is not checked, indicating that report header detail is not extracted.
-
To extract data from group headers, check the Group Headers check box. Group header data is then included in the extracted file at the top of each group of detail data. By default, this check box is not checked, indicating that group header detail is not extracted.
To combine extracted group header data with details on the same line, check the Combine Groups and Detail check box.
-
To extract data from group footers, check the Group Footers check box. Group footer data is then included in each column at the base of each set of detail data. By default, this check box is not checked, indicating that group footer detail is not extracted.
-
To combine group header data and group details in the extract file, check the Combine Groups and Detail check box. This means that group headers that you have specified for extraction are included in each line of group detail data.
By default, this check box is not checked, indicating that group headers and group details are not combined in the extract file. This control is enabled when you specify group headers for extraction. You cannot combine group footers with detail.
-
To extract numbers as strings formatted in the same way as they are printed, check the Numbers in Printed Format check box. By default, this check box is not checked, indicating that numbers are extracted as numeric values.
-
To extract dates as strings formatted in the same way as they are printed, check the Dates in Printed Format check box. By default, this check box is not checked, indicating that dates are extracted in the standard format.
-
To extract a frames(detail, group, and so on) as multiple records if its content spans more than one line, check the Each Frame as Multiple Lines check box. By default, this check box is not checked, indicating that each frame is extracted as a single record.
-
Click another tab if you want to make changes on other sheets of the Report Properties dialog.
-
Click the Apply button to apply the changes you have made or click the Close button to close the Report Properties dialog.
To save the recent changes when you close the dialog, you must click the Apply button immediately prior to closing the dialog. To abandon any changes that you have made but not yet applied, do not click the Apply button immediately prior to clicking the Close button.
To set text file output options in the Text File Options group box
-
In the Lines per Page text box, enter the number of lines after which a new-page character is written to the extract file. The default value of zero (0) indicates that no pagination is required.
-
In the Record Length text box, enter the maximum length of each record written.
If you enter a record length and the extracted data exceeds that length, the individual data item text might be truncated and spacing between fields might be scaled to fit the data proportionally within the record
By default, there is no maximum record length and no truncation occurs.
-
Click another tab if you want to make changes on other sheets of the Report Properties dialog.
-
Click the Apply button to apply the changes that you have made or click the Close button to close the Report Properties dialog.
To save the recent changes when you close the dialog, you must click the Apply button immediately prior to closing the dialog. To abandon any changes that you have made but not applied, do not click the Apply button immediately prior to clicking the Close button.

