Using the Details Sheet
Use the Details sheet of the Report Properties dialog to apply a report description and to change the default values for field alignment and spacing.
To enter a report description and change field alignment and spacing detail
-
Click the Details tab of the Report Properties dialog.
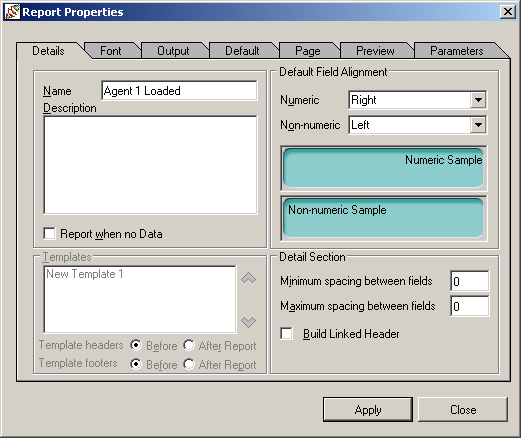
The Details sheet, shown in the following image, is then displayed.

-
In the Description text box, enter a description for this report, if required.
As well as providing documentation for the report, the description can be searched during the open process, providing you with the ability to locate reports with a particular content. For more details, see "Opening an Existing Report", earlier in this chapter.
-
To print page headers and footers even if there is no report detail to print, check the Report when no Data check box.
When this check box is not selected (that is, it is unchecked) and there is no data to print, no report is produced. When you check the Report when no Data check box and there is no data, the report header, page header, report footer, and page footer are printed but no detail or group sections.
By default, this check box is not checked.
-
In the Default Field Alignment group box, change the default values for the way in which numeric and non-numeric fields are aligned, if required.
Select alignment values from the Numeric list box and the Non-numeric list box.
You can also change alignment by using the samples in the green window in the Default Field Alignment group box. Click to the left or right of the sample to change the alignment.
By default, numeric fields are right-aligned and non-numeric fields are left-aligned.
-
In the Templates list box, select a template to apply to the current report. The Templates list box lists only those templates that you have attached to the current report. Use the up and down arrows to change the sequence in which the templates are applied to your report.
For details about creating templates, see "Creating Templates", later in this chapter. For details about attaching templates, see "Attach Template" under "Report Menu", later in this chapter.
Specify the order of report and template headers by selecting the Template headers, Before option button, or the After Report option button.
Specify the order of report and template footers by selecting the Template footers, Before option button, or the After Report option button. By default, template sections are printed before the corresponding report ones.
-
In the Detail Section group box, change the default values for the minimum and maximum spacing (in pixels) between fields, if required.
If you set the minimum spacing, this spacing is preserved when you move report fields. This enables you to insert a new field between two existing fields while still preserving the spacing between the fields.
If you set the maximum spacing, this spacing is preserved when you move report fields. If you delete a field, the fields that follow the deleted field (that is, those to the right) are automatically moved across while still preserving the maximum spacing between the fields.
By default, the minimum and maximum spacing are set to zero (0). The zero setting for the maximum spacing means that there is no maximum limit to the spacing between fields.
As changes to the minimum and maximum spacing are not applied to existing fields, you should set these values before you build your detail section.
This setting is intended for use in reports that have a straightforward layout (for example, text-only and with minimal formatting). Realignment using these minimum and maximum spacing values is therefore ignored if there is more than 50 percent difference in height between the narrowest and widest report detail fields.
-
Check the Build Linked Header check box if you want to create an automatic header for fields that you enter in the Detail section.
The automatic header is applied to the Page Header section and uses the initial text of your field alias. You can change your field alias name by using the Title text box of the Field Properties dialog. For details about the Field Properties dialog, see "Setting Field Properties" under "Using the Detail Functions", later in this chapter.
The page header field is automatically moved when you move the associated report detail field and is automatically deleted when you delete the associated report detail field.
By default, the Build Linked Header check box is not checked. Accept the default value if you want to create your own headings in the Page Header section. For details, see "Inserting a Literal" under "Using the Detail Functions", later in this chapter.
Linked headers for existing fields are not created when you select this option. If you want to apply this option to all detail fields, you should do so before you start to build your detail section.
To link and unlink headers independently of this option, use the Link Header and Unlink Header commands from the Edit menu. For details, see "Linking and Unlinking Headers", later in this chapter.
-
Click another tab if want to make changes on other sheets of the Report Properties dialog.
Alternatively, click the Apply button to apply the changes you have made or click the Close button to close the Report Properties dialog.
To save your recent changes when you close the dialog, you must click the Apply button immediately prior to closing the dialog.
To abandon any changes that you have made but not yet applied, do not click the Apply button immediately prior to clicking the Close button.
The options in the Detail Section group box apply only to the detail section of your report.

