Implementing an Interface
For a class to implement an interface, it must:
-
Indicate that it wants to use a specific interface
-
Satisfy the interface requirements by implementing all of the interfaces methods
For a class to implement an interface, it enters into a contract to provide a mapping between each method in the interface and a method from the class. This does not have to be a one-to-one relationship, as one class method can map to multiple interface methods for a specific interface or to one or more methods in multiple interfaces.
The only requirement is that the method signatures are compatible.
To implement an interface
-
In the Class List of the Class Browser, select the class that is to use the interface.
-
Select the Interface Mapping command from the Classes menu.
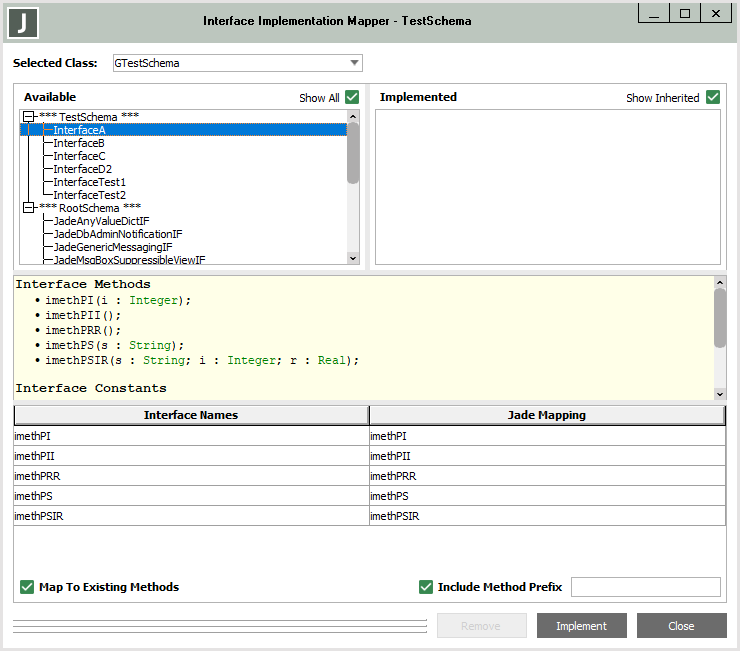
The Interface Implementation Mapper dialog is then displayed.
-
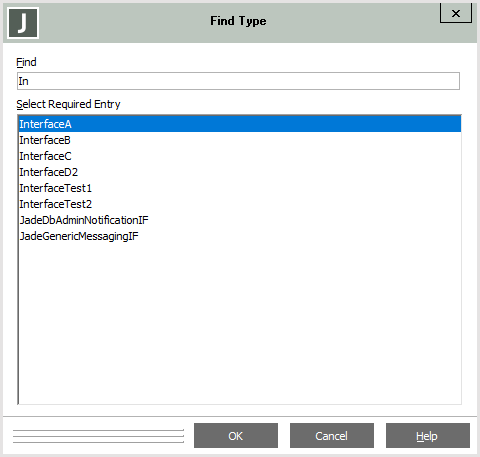
In the Available Interfaces list box, select the interface that you want to implement. Alternatively, if you want to search for an interface, press F4.
The Find Type dialog is then displayed, listing all available interfaces for classes in the schema from which you invoked the Interface Implementation Mapper dialog.

When you select an interface in the Available Interfaces list box of the Interface Implementation Mapper dialog (or in the Find text box of the Find Type dialog and you then click the OK button), the methods defined in the selected interface that the class must implement to satisfy the interface are then displayed in the first column of the table
An interface cannot be implemented by a class if it is already implemented by that class in a superschema or a subschema.
The JADE method mapping to the selected interface (that is, either a stub method that is automatically be generated in the selected class when the interface is implemented, or if you check the Map To Existing Methods check box, an existing method defined on the class) is displayed in the second column on the table.
In addition, a summary of the interface hierarchy, all methods, and constants defined in the selected interface are displayed in the read‑only pane in the middle of the dialog, as shown in the following image.

The interface summary text box includes information about any super interfaces belonging to the selected interface. If the selected class does not implement one or more of these prerequisite super interfaces, they are displayed in red with the expression (not implemented) beside their name. In addition, if a super interface implementations is missing, the Implement button is disabled. If the super interfaces are implemented or inherited by the selected class, they are displayed in green
-
Use the Selected Class drop-down combo box at the top of the dialog to quickly transition to different classes without closing and reopening the dialog every time.
-
If you want to list all interfaces for the current schema and its superschemas in the Available Interfaces list box, check the Show All check box. By default, only interfaces of the current schema view are listed (for example, if the owning Class Browser is viewing the current schema and superschema classes, by default interfaces in both those schemas are listed).
-
Check the Show Inherited check box above the implemented interfaces list box if you want to display the interfaces implemented on any superclasses of the currently selected interface in the interfaces list box. The inherited interfaces also display the schema and superclass in which they are implemented.
-
You can enter any valid method name in the combo box of a cell in the second column, to create a new class method (to which normal method naming rules apply) or you can select an existing class method (by using the drop-down list box portion of the combo box) from the list of any existing class method that has a complementary method signature.
-
Below the interface mapping table is the Map To Existing Methods check box, which is checked by default when the dialog opens so that the dialog attempts to map the interface methods to existing class methods with an identical name and compatible method signature.
This overrides the method prefix behavior; that is, if the Map To Existing Methods check box is checked and a compatible method exists, the dialog attempts to map to this method regardless of the Include Method Prefix check box state.
-
If you want add a method prefix to all mapped method names, perform the following actions.
-
In the text box at the right of the Include Method Prefix check box, specify the value (for example, test_) that you want to apply to all JADE methods that are mapped to the selected interface.
-
Check the Include Method Prefix check box.
The default value of this check box and the method prefix text box value are determined by your user profile settings; that is, the Include Method Prefix check box is checked when the Generate stub methods without prefix check box in the Interface Options group box on the Miscellaneous sheet of the Preferences dialog is unchecked.
-
-
To remove a method prefix from all mapped methods, perform the following actions.
-
-
Disable the Include Method Prefix check box.
If you want to remove a method prefix from all JADE methods in the target class that are mapped to the interface, perform the actions in this step before you click the Implement button.
As the modification of a mapped method name (both adding and removing a prefix) creates a corresponding method, removing a prefix does not remove the method from the target class. For more details, see "Stopping the Implementation of an Interface", later in this chapter.
-
-
Click the Implement button.
The selected class is updated to include any new methods that are required to satisfy the interface. These methods contain only the method signature and template. A mapping is then set up between the interface methods and the corresponding JADE methods that were selected for mapping in the dialog. (These can be new or existing methods, depending what was selected in the mapping table.)
-
Click the Close button.
If you click the Close button or select another class or interface before you have clicked the Implement button, a message box is displayed, prompting you to confirm that you want to save pending changes. If you click the No button in this message box, your mappings to that interface are not saved.
Generated stub methods in classes implementing interfaces provide only the method signature and template; that is, they do not provide any implementation details. It is your responsibility to define the appropriate source for each method in the implementing class so that it performs the required action or actions.
In the Interface Options group box on the Miscellaneous sheet of the Preferences or JADE Installation Preferences dialog, if you want:
-
A compile-time error generated when the stub method is created (that is, it is marked in error in the Methods List of the Class Browser), check the When implementing an interface, do not compile automatically generated stub methods check box.
-
New interface method names to be generated with the same name as the original interface method name, with no added prefix, check the Generate stub methods without prefix check box.
When you check the Generate stub methods without prefix check box, the Generated stub method prefix text box is disabled and the generated stub methods have the same name as the interface method (unless there is a conflict with an existing name, in which case a number is appended to the name).
-
To specify the method name prefix that is generated for all new implemented interface methods, specify the prefix that you require in the Generated stub method prefix text box.
When a method is added to the interface, the prefix specified in the user preferences is used unless you check the Generate stub methods without prefix check box, in which case no prefix is used.
These options apply to new implemented interface methods only; that is, they do not affect existing implemented interface method names. For details, see "Maintaining Miscellaneous Options", in Chapter 2.
Stub methods are then automatically generated with body details that you must comment out or remove before the method compiles, as a way of highlighting that you have yet to provide the required method body. For example, you can locate these empty methods by displaying methods in error, to find the methods that you are likely to want to flesh out to make the implementation useful.
To display the interface methods to which a class method is mapped, see "Displaying Interface Methods to which the Selected Method is Mapped", in Chapter 4. See also "Viewing Interface Method Mappings", earlier in this chapter, for details about displaying the implemented methods grouped by the interface or interfaces in which they are defined in the Methods List of the Class Browser.

