Using the Layout Sheet
The Layout sheet of the Field Properties dialog is displayed when you click the Layout tab. Use the Layout sheet to change the absolute position and size of your report field.
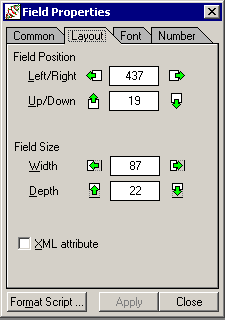
Your field position and size are set when you paint the field onto your layout. (For details, see "Inserting Report Fields", earlier in this chapter.) These values are displayed by default in the boxes on the Layout sheet. An example of the Layout sheet is shown in the following image.
To change the absolute position and size of your field
-
Use the buttons beside the text boxes to change the values in the text boxes. Clicking once on a move or size button increases or decreases the position or size value by one pixel.
-
To enter absolute values, perform the following actions.
-
In the Left/Right text box, enter the horizontal start position of your field, measured in pixels from the start of the frame.
-
In the Up/Down text box, enter the vertical start position of your field, measured in pixels from the top of the frame.
-
In the Width text box, enter the width of your field, measured in pixels.
-
In the Depth text box, enter the height of your field, measured in pixels.
-
-
Click another tab if you want to make changes on other sheets of the Field Properties dialog.
To select a field to be output to an XML extract file
Check the XML attribute check box if the property value of the field is to be an attribute of the associated frame or section element rather than a child element within it when the report is run to extract data in XML format. For example, the XML output for a detail section with two fields f1 and f2 as elements (that is, the XML attribute check box is not checked) is as follows.
<detail>
<f1>f1 value</f1><f2>f2 value</f2>
</detail>
If field f2 has the XML attribute check box checked, the XML output is as follows.
<detail f2="f2 value">
<f1>f1 value</f1>
</detail>
Click the Apply button to apply the changes that you have made or click the Close button to close the Field Properties dialog. To save the recent changes when you close the dialog, you must click the Apply button immediately prior to closing the dialog. To abandon any changes that you have made but not yet applied, do not click the Apply button immediately prior to clicking the Close button.

