Inserting Report Fields
The JADE Report Writer Designer application provides an easy-to-use drag and drop feature that enables you to place report items on your layout.
Although this subsection assumes that you select fields from the Catalog of Available Fields dialog, you can also drag and drop fields from the items on the Insert menu. For details about the Insert menu, see "Insert Menu", later in this chapter.
This subsection describes the functions that are common to inserting any field from the System sheet of the Catalog of Available Fields dialog. The procedures required to insert fields, described in the following subsections, differ from field to field.
For details about creating and inserting parameter, script, and summary fields, and displaying their usage, see "Using the Catalog of Available Fields Dialog", later in this chapter.
To display the Catalog of Available Fields dialog, perform one of the following actions
-
Press the F6 key
-
Select the Catalog command from the View menu
The Catalog of Available Fields dialog is then displayed in the JADE Report Writer Designer application window.
It is convenient to leave the dialog displayed while you develop your layout, as it provides all of the tools that you require to complete the details of your report. For details about using the Catalog of Available Fields dialog, see "Using the Catalog of Available Fields Dialog", later in this chapter.
To insert a report field on the layout using the drag and drop technique
-
Click the field that you want to add to your report and then hold down the mouse button.
-
While continuing to hold down the mouse button, move the cursor across the layout (that is, drag the field). For most fields, the cursor becomes a dotted rectangle that you can place accurately.
For greater accuracy in placing fields, you can display a grid on the layout. For details, see "Show/Hide Grid" under "View Menu", later in this chapter. If you select the Snap to Grid command, fields are neatly aligned by "sticking" to the points of the grid. For details, see "Snap to Grid" under "View Menu", later in this chapter.
-
Release the mouse button (that is, drop the field) when the selected field is in the required position.
Absolute accuracy is not essential at this point, as you can refine the positioning at any time during your design session. For details, see "Using the Layout Commands", later in this section. Moving your field is also described later in this subsection.
The field is inserted at the point where you released the mouse button (or dropped it).
You can also drag and drop fields from the Insert menu. For details, see "Insert Menu", later in this chapter.
The instructions in this section and the following subsections are based on using the Catalog of Available Fields dialog to access field types.
You can change field properties by selecting the Properties command from the popup menu that is displayed when you right-click on a field. For details, see "Setting Field Properties", later in this chapter.
To insert a report field by using the Select button on the Catalog of Available Fields dialog
-
Click the field that you want to add to your report.
-
Click the Select button.
-
Click on the position on your report at which the field is to be placed.
Absolute accuracy is not essential at this point, as you can refine the position at any time during your design session. For details, see "Using the Layout Commands", later in this section. Moving your field is also described later in this subsection.
The field is inserted at the point that you specified.
To resize a report field
-
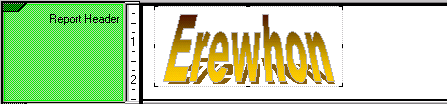
Click once on the field to display the resizing handles, which are the small blue squares positioned around the field when the field is selected, as shown in the following image of an example of a literal field.

This literal text is larger than the default receiving field that the JADE Report Writer Designer application displays when a literal is dropped into the layout. In this case, you need to extend the field so that the whole literal is visible.
If this is a new field that you have just dragged and dropped into position, resizing handles are displayed by default.
-
Click one of the resizing handles and then hold down the mouse button.
A double-headed arrow is displayed over the resizing handle, as shown in the three examples in the following image.

These examples show the directions in which the box can be stretched, depending on the resizing handle that you click.
-
To enlarge the box, drag (that is, hold down the mouse button) a resizing handle in a direction indicated by the arrows and then release the mouse button at the required point.
The following image shows the box enlarged by dragging the resizing handle at the far right (that is, the third example in the previous image).

-
If your field is too big to fit into its section, enlarge the section by performing the following actions.
-
Click and then hold down the mouse button on the section separator below the section that you want to enlarge. The section adjustment pointer is displayed on the line, as shown in the following image.

-
While continuing to hold down the mouse button, drag the line down until your field fits the section, as shown in the following image.

-


You can also resize fields by using commands on the Field Properties dialog or the layout commands. For details, see "Setting Field Properties" and "Using the Layout Commands", later in this chapter.
To move a report field
-
Click once inside the field. The cursor then changes to a crossed arrows symbol, the move handle.
If this is a new field that you have just dragged and dropped into position, the cursor changes to a crossed arrows symbol (
 ) when you move into the field area.
 -
Move the field by performing the following actions.
-
Click in the field.
-
Hold down the mouse button.
-
Drag the field to the new position.
-
Drop the field at that position by releasing the mouse button.
-

You can also move fields by performing one of the following actions.
-
Use the commands from the Field Properties dialog or the layout commands. For details, see "Setting Field Properties" and "Using the Layout Commands", later in this chapter.
-
Select a line or box and use the arrow keys. Each keystroke moves the field one pixel in the appropriate direction.
The Shift+arrow key combination moves the selected field one grid position when the snapping to grid option is enabled or one pixel if the snap to grid option is disabled.
To delete a report field
-
Right-click over the field that you want to remove from your layout.
-
Select the Delete command from the popup menu that is then displayed.
A dialog is then displayed, prompting you to confirm your deletion.
-
Click the Yes button to delete the field. Alternatively, click the No button to cancel the deletion and retain your field.
The field is then removed from your layout.
To review a report field
-
Hold your cursor on the field for a few seconds until a line of description (or bubble help) is displayed below the field, as shown in the following image.


In this example, the cursor has been moved over the third field from the left in the detail section and a description of the field is displayed below the field.
The field in this example is a database field whose bubble help shows a short description of a sale item from the retail sales list of the current client.

