Changing Attributes
When you have selected the interfaces for inclusion in the exported package working set and clicked the Next > button, the Change Attributes sheet of the Export Package Definition Wizard is then displayed, as shown in the following image.
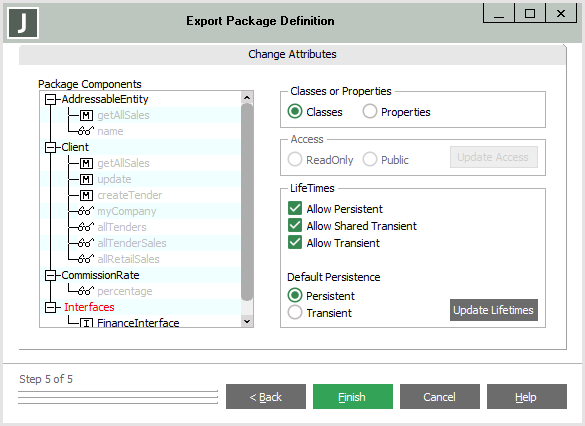
This sheet enables you to change selected attributes of any class or property in your exported package.
To change the attributes of a class or property
-
In the Package Components list box, select the class or property whose attributes you want to change. The attributes of that class or property are then displayed in the group box controls at the right of the sheet. Attributes that cannot be changed are disabled (for example, the class lifetimes or default persistence are disabled if you select a property or controls in the Access group box are disabled if you select a class).
-
Use the option buttons in the Classes or Properties group box to toggle the availability of classes or properties in the Package Components list box.
By default, the selection of classes is enabled; that is, the Classes option button is selected. Select the Properties option button if you want to make the properties in your exported package working set available for selection.
-
If a property is selected in the Package Components list box and you want to change the access type for that property, select the ReadOnly or Public option button in the Access group box and then click the Update Access button. As you cannot export protected properties, this access type is not displayed.
The access for that property in your working set is then changed and the icon at the left of the property in the Package Components list box displays the appropriate icon to reflect the public or read-only access type.
-
If a class is selected in the Package Components list box, check or uncheck the appropriate check boxes to specify the permitted lifetimes for instances of the class. By checking the appropriate check box, instances can have one or more of the following lifetimes.
-
Persistent
-
Shared transient
-
Transient
For details, see "
-
-
If you want to change the default persistence of instances of the class selected in the Package Components list box, select the appropriate Default Persistence option button; that is, Persistent or Transient. You can still create a transient instance of a persistent class and a persistent instance of a transient class.
For details, see "
-
If a class is selected in the Package Components list box and you have changed the lifetime or persistence attributes of that class, click the Update Lifetimes button to save your changes.
-
Click the Finish button when you have changed all of the class and property attributes you require for components of your exported package.
Alternatively, click the < Back button to redisplay the Select Classes and Features for Package sheet to modify prior selections or the Cancel button to abandon your selections and close the wizard.
-
When you click the Finish button, if there are items referenced by your selection but not selected for inclusion, a Warning message box is then displayed, advising you of the items that are referenced by but not included in your selection, and allowing you to specify if you want to add them to you export package.
-
Click the Yes button to confirm that you want to include the specified items or the No button if you do not want to include them.
-
If you click the Yes button, the Change Attributes sheet is redisplayed with the newly included items displayed in blue.
You can click the < Back button on the Change Attributes sheet to return previous sheets to refine your selection.
-
Click the Finish button when you have changed all of the class and property attributes you require for components of your exported package.
The Export Package Definition Wizard is then closed and your exported package created, based on your selections.
When the Export Package Definition Wizard has closed, the exported package is selected in the Export Packages Browser. You can:
-
Change the exported package definition (for details, see "Changing a Package by Using the Export Package Definition Wizard", in the following subsection)
-
Extract it as a .scm file so that it can be imported for re-use by developers at another site or in another database (for details, see "Extracting a Package", later in this chapter)
-
Import it into another schema in the same database (for details, see "Importing a Package", later in this chapter)

