Using the Backup Database Command
Use the Backup Database command from the Operation menu to specify the parameters for and to initiate an offline database backup.
You can backup your complete database or selected files only. For more details, see "Offline Full Backup", in Chapter 3.
To perform an offline backup of your database
-
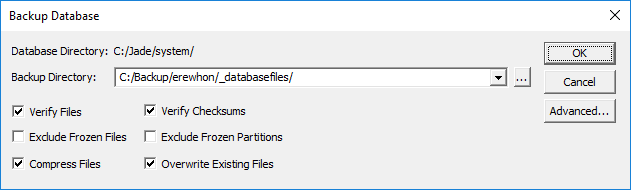
Select the Backup Database command from the Operation menu. The Backup Database dialog, shown in the following image, is then displayed. (Your current database directory is displayed above the Backup Directory combo box.)

-
In the Backup Directory combo box, specify the path name for the backup destination directory where database files are copied during the backup process. You must specify a directory that is valid on the server.
Alternatively, click the adjacent browse button (indicated by the … points of ellipsis symbol) to display the common Browse for Folder dialog that enables you to select the backup directory in which your backed up database files will be located.
-
Uncheck the Verify Files check box if you do not want to verify your database files as they are backed up. By default, this check box is checked, indicating that index block‑to‑target (object, subobject, and so on) verification is performed, to ensure that index entries resolve to the correct records in the file. (See also "Verification during Backup", in Chapter 3.)
-
Uncheck the Verify Checksums check box if you do not want to perform MD5 checksum verification of files as they are backed up, to ensure that corruption is not introduced by hardware or environmental problems. By default, this check box is checked.
-
Check the Exclude Frozen Files check box, to exclude frozen (read-only) database files from the backup. By default, this check box is unchecked.
-
Check the Exclude Frozen Partitions check box, to exclude frozen (read-only) database partitions from the backup. By default, this check box is unchecked.
-
Uncheck the Compress Files check box if you do not want to compress your database files as they are backed up. By default, the Compress Files check box is checked.
-
Check the Overwrite Existing Files check box, to overwrite any existing files in your specified destination backup directory. By default, the Overwrite Existing Files check box is unchecked.
-
Click the Advanced button, to exclude files from the offline backup or to backup files to different locations. The advanced backup parameters enable you to select (or deselect) individual files for backup and change the logical location name for each file, if required. For details, see "Selecting Your File Backup Locations".
-
When you have defined all of your backup parameters and optionally your file backup locations, click the OK button, to save your parameters in the system registry and initiate the database backup process. Alternatively, click the Cancel button, to abandon your selections and close the dialog without initiating the backup operation.
A fast backup is performed if files are neither verified nor compressed. In a fast file backup, database files are backed up in a similar fashion to a standard file copy, using large buffers and asynchronous I/O to speed up the copy process.
The fast backup mode bypasses the database access routines and cache management, and does not verify data as it is backed up.
While the operation is running, a progress dialog is displayed that enables you to monitor the progress of the operation. You can abort the run by clicking the Cancel button.
If any errors are encountered during the backup, the backup cannot be restored.
When the operation is finished, the progress dialog is closed and the following message is displayed in the running report.
<<Database backup complete>>
Information or errors from the backup operation are recorded in the backup.log file, located in the default database directory.
To view the log, select the backup.log submenu from the View menu View Logs command. For details, see "Viewing Log Files", later in this chapter.

