Selecting Your File Backup Locations
When you click the Advanced button in the Backup Database dialog, the Select Files And Backup Destinations dialog is displayed. An example of the Select Files And Backup Destinations dialog is shown in the following image.
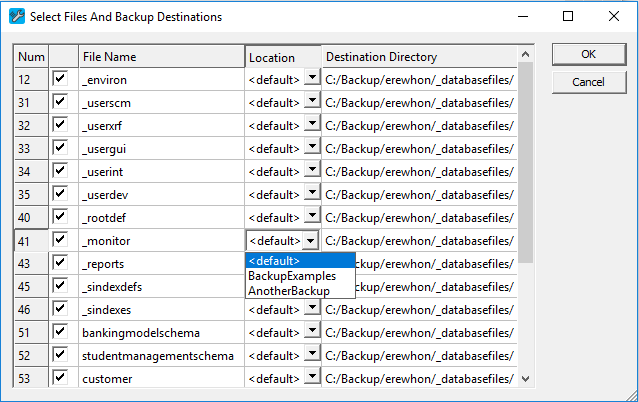
Use this dialog to select (or deselect) individual files for backup and to change the logical location name and destination for each file, if required.
The Num column contains a schema-defined file number for each file selected for offline backup, the File Name column contains the name of each of your database files, and the Destination Directory column displays the destination directory of each database file.
The locations and destination directories are those defined in the Name and Directory fields of the Add Backup Location dialog, and can be added or removed only by using the Backup Locations dialog. For details, see "Using the Backup Locations Command", earlier in this chapter.
To select the files for backup and the individual file backup locations
-
In the column of check boxes at the left of the File Name column, uncheck each checked box (indicated by a () to exclude the corresponding database file from the backup. Alternatively, check any file for backup that is currently excluded (that is, its check box is unchecked) if you now want it to be backed up.
-
In the Location column, click the drop down list box if you want to change the file location for a specific database file.
Each file location that you have specified in the Backup Locations dialog is listed, to enable you to select the logical location for your backed up database file. For example, if you are backing up two large user database files, you may want to back up a file called Bok to a Dest1 file location on drive d:\backups and another file called Internet to a Dest3 file location on drive s:\large\backups, where you know there is sufficient room for the backed up file.
-
When you have selected all of the files that you want backed up and the logical locations of these backed up files, click the OK button. The Backup Database dialog is then redisplayed, to enable you to make any final modification to your parameters before initiating your backup.
Alternatively, click the Cancel button to abandon your selections.

