Preferences Command
Use the Preferences command from the Users menu to set default preferences that you want to apply to your Jade Report Writer Designer and Jade Report Writer Configuration sessions.
To display the User Preferences dialog, perform one of the following actions
-
Select the Preferences command from the Users menu.
-
Select the User Preferences dialog by selecting the User Preferences command of the Configuration menu when you have an open reporting view.
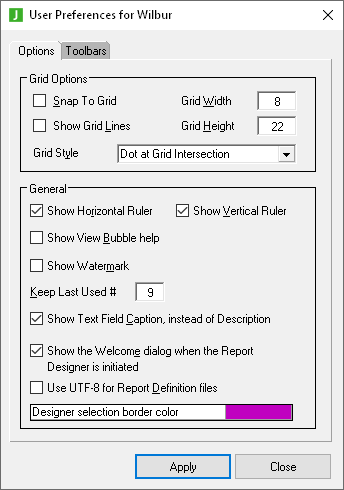
The Options sheet of the User Preferences dialog, shown in the following image, is then displayed.
To set your report preferences on the Options sheet of the User Preferences dialog
-
To automatically align your report fields so that they are attached to the nearest point on the grid, check the Snap to Grid check box. By default, this option is not activated and report fields are not attached to the nearest grid point.
Use the grid to facilitate the precise placement of items in your layout. The controls in the Grid Options group box (see steps 1 through 5 of this instruction) provide options that enable you to align fields to the grid, show or hide the grid, and customize the look of the grid.
Although the grid helps you to place items on your layout, the grid display is optional.
-
To disable the grid lines on your report design layout, uncheck the Show Grid Lines check box. The grid lines are not displayed, by default.
-
In the Grid Width text box, enter the width in pixels of your grid columns, if required. The default value is 8 pixels.
-
In the Grid Height text box, enter the height in pixels of your grid rows, if required. The default value is 22 pixels.
A pixel is a picture element and is the smallest element that can be displayed on the screen.
-
In the Grid Style list box, select a style for your grid lines, if required. The grid styles are listed in the following table.
Grid Style Grid lines are… Dot at Grid Intersection Formed from dots Cross at Grid Intersection Formed from crosses Grid Lines Solid lines The default value is Dot at Grid Intersection.
-
To remove the horizontal ruler from the display, uncheck the Show Horizontal Ruler check box. The horizontal ruler is displayed, by default.
-
To remove the vertical ruler from the display, uncheck the Show Vertical Ruler check box. The vertical ruler is displayed, by default.
-
To display bubble help captions in your Jade Report Writer Configuration window when configuring your views, check the Show View bubble help check box. When bubble help is displayed for reporting views, resting the cursor on a class or feature for a few seconds displays a description of the class, property, method, or collection. For details, see "Viewing Bubble Help", earlier in this chapter.
-
To display section (frame) names inside the sections of the report design layout as background images, check the Show Watermark check box. This provides a wider layout on which to design your report.
By default, the display shows the section (frame) names to the left of the report design layout.
-
In the Keep Last Used # text box, enter the number of entries for recently opened report designs to be displayed at the bottom of the File menu, if required.
The last-used list provides you with a quick way of opening a recently used report view or design.
-
To display the field description instead of the text field captions within the field delimiters on your report design layout, uncheck the Show Text Field Caption, instead of Description check box.
This check box is checked by default, which means that text field captions are displayed. Text field captions show the basic format of the field; that is, a series of X characters for string fields and a series of 9 characters for numeric fields. The number of characters displayed reflects the maximum length of the field.
The following image on the left shows two database fields with their text field captions displayed. (The top field is a currency field that shows the dollar currency symbol.) In the image on the right, the field descriptions are displayed within field delimiters.
The parameter, script, or summary field name is always displayed on the status bar when a field of that type is selected.
-
To bypass the Welcome dialog when you start your Jade Report Writer Designer session, uncheck the Show the Welcome dialog when Report Designer is initiated check box. This check box is checked by default, indicating that the Welcome dialog is displayed when you start your Jade Report Writer Designer session.
For details about using the Welcome dialog, see "Opening an Existing Report" or "Starting a Report from Scratch", in Chapter 4.
-
To set UTF‑8 with a Byte Order Mark (BOM) as the default encoding format for extracted or unloaded report definition files, check the Use UTF-8 for Report Definition files check box. If you check this check box, the Use UTF-8 file encoding check box is checked by default on dialogs for extracting and unloading Jade Report Writer files; that is, .rwf, .rwo, .rwr, .rwu, .rwv, and .rwa.
By default, the Use UTF-8 for Report Definition files check box is not checked; that is, native ANSI or Unicode is the default format for extracted or unloaded report definition files.
-
To configure the color of the dashed border of selected fields on a report in the Jade Report Writer Designer application, double‑click on the Designer selection border color control.
The common Color dialog is then displayed, to enable you to select the color that you require for the selected report fields in the Jade Report Writer Designer application. When you have made your selection, click the OK button to apply the selected color or click the Cancel button to close the Color dialog without making any changes.
The default border color is purple.
-
To set the toolbars that are displayed in the Jade Report Designer application, click the Toolbars tab to display the Toolbar sheet.
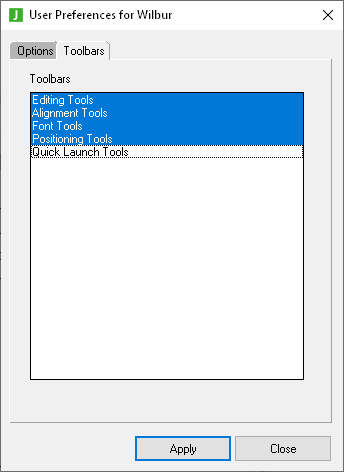
The Toolbar sheet, shown in the following image, is then displayed.
To use the Toolbar sheet to set the way the toolbars are displayed
-
In the Toolbars list box, click one of the toolbar titles to change the display status of the toolbar.
Highlighted (white on blue background) toolbars are visible on the Jade Report Designer window. Non‑highlighted toolbars are hidden (for example, the Alignment Tools in the previous image). All toolbars are displayed, by default.
You can relocate a visible toolbar by clicking and dragging the icon that is positioned at the left of the toolbar.
For details about using the toolbars, see "Using the Layout Commands", in Chapter 4. For details about the Quick Launch Tools toolbar, see "Using the Quick Launch Tools", in Chapter 4.
To apply your user preferences settings
-
Click the Apply button.
-
Click the Close button if you do not want to make more preference changes.
Your user preferences are then applied.


