Selecting Classes and User-Defined Tables for Your Relational View
When you have specified if superschema classes are to be included in your relational view, the Relational View Wizard then enables you to select the classes and user-defined tables that are to be visible (included) in your relational view.
An example of the third sheet of the Relational View Wizard is shown in the following image.
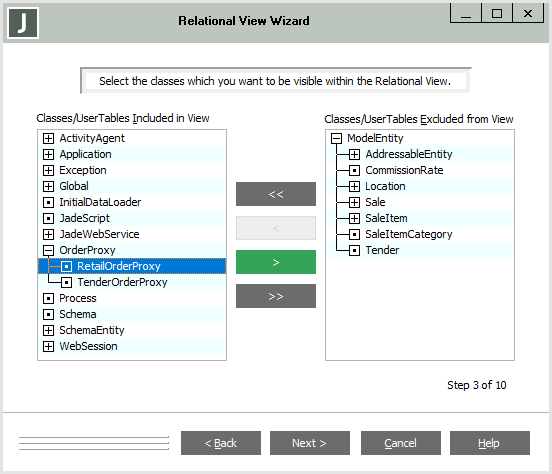
The included and excluded classes and user-defined tables are displayed in list boxes in their class hierarchy. If a class has subclasses, it is displayed as a collapsible and expandable node in the list box. When you perform an action on an expanded class item with subclasses, your action applies only to that class. When you perform an action on a collapsed class item with subclasses, your action is applied to that class and each of its subclasses.
To preserve the class hierarchy, a class may need to be displayed in a list box of which it is not a member. When this occurs, the item is grayed (disabled from selection), to indicate to the user that it is omitted from this list box. The Next > button is disabled if no classes or user-defined tables are included in the view.
User-defined tables are displayed in red at the end of a list after all of the classes.
To include a class or user-defined table in your relational view
-
In the Classes/User Tables Excluded from View list box at the right of the Relational View Wizard, select the class or user-defined table you want to include in your relational view and then click the < button to move the selected class or user-defined table to the Classes/User Tables Included in View list box at the left of the dialog.
Alternatively, you can:
-
Double-click a class or user-defined table in the Class/User Tables Excluded from View list box to include it in your view.
-
Move all classes and user-defined tables for inclusion by clicking the << button.
-
-
Repeat step 1 for all classes and user-defined tables that you want to include in your relational view.
-
Click the Next > button when you have selected all of the classes and user-defined tables that are to be included in your view. (The Next > button is enabled when at least one class or user-defined table is included in the Relational View.)
Alternatively, click the < Back button to redisplay the previous dialog or the Cancel button to abandon your selections.
When you click the Next > button, the Relational View Wizard then enables you to set the root class of your relational view.
To exclude a class or user-defined table from your relational view
-
In the Classes/User Tables Included from View list box at the left of the Relational View Wizard, select the class or user-defined table you want to exclude from your relational view, and then click the > button to remove the selected class or user-defined table from your view, and move it to the Classes/User Tables Excluded from View list box.
Alternatively, you can:
-
Double-click a class or user-defined table in the Class/User Table Included in View list box to exclude it from your view.
-
Exclude all classes and user-defined tables from your relational view by clicking the >> button.
-
-
Repeat step 1 for all classes and user-defined tables that you want to exclude from your relational view.
-
Click the Next > button when you have selected all classes and user-defined tables that are to be excluded from your view.
Alternatively, click the < Back button to redisplay the previous dialog, or the Cancel button to abandon your selections.
When you click the Next > button, the Relational View Wizard then enables you to set the root class of your relational view.

