Renaming Tables and Columns
When you have refined the visibility of class or user-defined table features, the Relational View Wizard then enables you to rename tables and columns in the relational view; for example, if a class name conflicts with an ODBC reserved word or to define the relational column size for methods that return decimal values.
An example of the ninth sheet of the Relational View Wizard is shown in the following image.
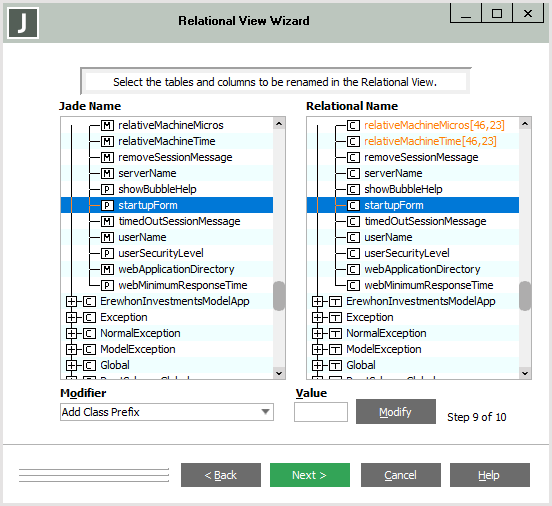
The JADE name of all classes and user-defined tabled and of all properties and methods in those classes and user-defined tables included in the relational view are listed at the left of the sheet. The relational names of the corresponding tables and column are listed at the right of the sheet. In the relational names pane, any relational view names that are:
-
ODBC reserved words are highlighted in yellow
-
Not the same as the JADE class, method, or property name are displayed in an orange font
-
Methods that return decimal values display the decimal designation
You can expand all class or table nodes to show all of their method and property entities or mapped columns, respectively, or you can collapse them to show only the class or table name itself. An expanded node is displayed with a minus sign (-) and a collapsed node that has entities displays a plus sign (+). A node that has no entities has no sign.
Alternatively, select the Collapse All Classes or Expand All Classes command from the popup menu that is displayed when you right-click in the Jade Name or the Relational Name list box.
To rename table and column relational view names
-
In the Relational Name list box, double-click the specific table or column whose relational name you want to change. Alternatively, select the Edit Relational Mapping Name command from the popup menu that is displayed when you right-click on an entity.
The entity is then displayed in the editor bar, to enable you to change the name to the required value and then press Enter (if you do not want to change the values of any more entities).
By default, the editor bar is not hidden after each update; that is, the editor bar remains visible after updating an entity so that you can perform multiple edit actions by scrolling up or down the list box by using the up (↑) and down (↓) arrow keys. The List Editor message box is then displayed, prompting you to click the Yes button if you want to update the selected values or the No button if you want to abandon your changes. The editor bar is then positioned on the next entity, and stays visible until you change focus. To hide the display of the editor bar after updating an entity, select the Hide Editor After Each Update command from the popup menu that is displayed when you right-click on an entity.
You can change the color of the editor bar by double-clicking the colored portion at the left of the editor bar (which is orange by default) and then selecting the color that you require from the common Color dialog that is displayed. When you click the OK button in the Color dialog, the editor bar is then displayed in your selected color.
-
If you want add a class, method, or property prefix to all relational view tables, method columns, or property columns, perform the following actions.
-
Ensure that the appropriate Add Class Prefix, Add Method Prefix, or Add Property Prefix value is displayed in the Modifier list box.
-
Specify the value in the Value text box (for example, test_) that you want to apply to all tables or columns in the relational view that are mapped to user-defined tables or JADE classes, methods, or properties.
-
Click the Modify button.
If you have multiple schema and relational view pairs defined for your ODBC Data Source Name (DSN), you should perform these steps to add a class or user-defined table prefix so that there are no name conflicts in the included relational views.
-
-
To remove a class, method, or property prefix from all relational view tables, method columns, or property columns, perform the following actions.
-
Ensure that the appropriate Remove Class Prefix, Remove Method Prefix, or Remove Property Prefix value is displayed in the Modifier list box.
-
In the Value text box, specify the user-defined table, class, method, or property prefix you want to remove from the relational view tables or columns (for example, prod_).
-
Click the Modify button.
-
-
As methods that return decimals have the decimal designation following the relational view column name, you can edit this to change the length and scale factor with which the column for that method is to be defined. For example, you can edit the getMyDecimal[46,32] method (the default declaration that includes all possible decimal values) to getMyDecimal[12,2].
-
Repeat steps 1 through 4 of this instruction for each table or column that you want to edit.
-
Click the Next > button when you have edited all required relational view entities. Alternatively, click the < Back button to redisplay the previous sheet or the Cancel button to abandon your selections.
When you click the Next > button, the Relational View Wizard then enables you to build (generate) your relational view.

