Defining a Schema
When you are developing a JADE system or you have installed JADE for the first time, you must first add your own schema to the system-supplied RootSchema.
To add a schema
-
In the Schema Browser, select the RootSchema.
-
Select the Add command from the Schema menu. (You can add a schema only when the Global class in any superschema does not require reorganization.)
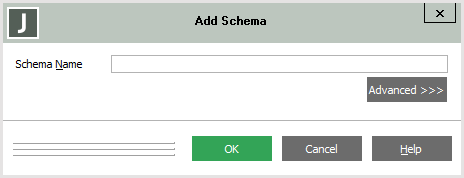
The initial form of the Add Schema dialog, shown in the following image, is then displayed.

-
In the Schema Name text box, specify the name of the schema that you want to define. Your schema name must start with a letter, it must be unique, and can contain alphanumeric characters only. (JADE automatically converts the first letter to uppercase, if required.)
If you do not want to change any default values, go to step 15 of this instruction.
-
If you want to change default values, click the Advanced button.
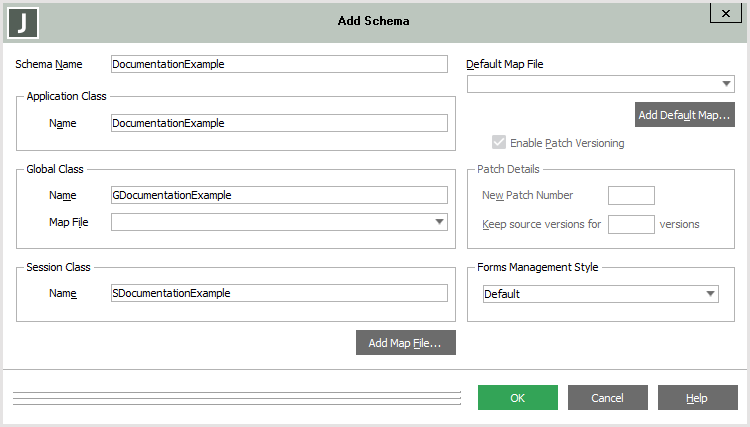
The extended Add Schema dialog, shown in the following image, is then displayed.

The logical entity representing a database file, sometimes referred to as a map file in JADE, provides a convenient way of separating the user’s view of data from some of the practical considerations associated with storing that data on disk. A schema database has its own set of files and class maps that are used when any of the applications of that schema is executed. A subschema database can reuse or override the file definitions of its superschema.
The default map file specifies the name of the database file that is used when reading or writing instances of a class for which no map file has been defined. The default map file that is created is based on the schema name specified in step 3 of this instruction.
The map file for the global instance is the default map file.
You can change map files (that is, the path in which your class map file is located) only by using the batch JADE Database utility. For details, see the
-
If you want a different default map file (for example, if you are adding a subschema to an existing user-defined schema) select an existing map file from the list box in the Default Map File combo box.
-
If you want to define a new map file that you can then select as the default map file in the Default Map File combo box, click the Add Default Map button.
You cannot select a map file that is marked as partitioned and that already has a class map defined for it.
The File Dialog is then displayed.
-
In the File Name text box, specify a valid file name prefix for the default class map file; for example, defmap.
The map file name cannot contain the - \ / : * ? " < > | . characters or spaces.
-
Check the Partitionable check box if the database map file can be partitioned. (You cannot change the value of the Partitionable check box if the
A partitioned database file must have zero or one classes mapped to the file. A collection class cannot be mapped to a partitioned file.
Because the default map file cannot be partitioned, this check box is disabled when you specify the default map file for a new schema.
-
Click the OK button. Alternatively, click the Cancel button to abandon your selections.
-
Return to step 5 of this instruction if you want to select your specified file as the default map file. (See also "System Map Files", later in this chapter.)
-
-
The application class name defaults to the name of the schema. If you want to change the default application class name, specify the name in the Name text box in the Application Class group box.
A schema can contain one or more applications, each of which is an instance of the
Persistent instances of the Application class are mapped to _usergui.dat. You cannot change this mapping, which identifies the database file in which persistent instances of the application are stored.
-
The global class defaults to the name of the schema prefixed with G, but you can change it if you wish, by specifying that you require for your global class in the Name text box in the Global Class group box.
JADE automatically creates a single persistent instance of your global class. There can be one instance of this class only. All applications in the schema have a reference to this single global instance (by using the
You cannot select a map file that is marked as partitioned and that already has a class map defined for it.
-
In the Global Class group box, select your map file for the global class in the Map File combo box if you want to change the map file for the global class to an existing map file name.
Alternatively, you can add a new map file by using the Add Map File button. (For details about using the File Dialog that is then displayed, see step 6 of this instruction.)
-
The session class defaults to the name of the schema prefixed with S, but you can change it by specifying the name of your session class in the Name text box in the Session Class group box. This session class is created as a subclass of the
For Web-enabled applications, a transient instance of the Web session class is created for each Web session when a Web-enabled application is run. Your logic can access this transient instance by using the
-
If global patch versioning is set for your database, check the Enable Patch Versioning check box if you want patch versioning applied to your new schema. This check box is disabled if global patch versioning has not been set for your database. For details, see "
-
If patch versioning is enabled for your new schema (that is, the Enable Patch Versioning check box is checked), specify a new patch number in the New Patch Number text box if you want to assign a new patch version number for changes made by all developers in your new schema.
By default, the new patch number is 1.
-
In the Keep source versions text box, specify the number of changes within the current patch version number whose sources you want to keep if you do not want to keep the default number of changes (that is, 10).
If the specified number of source changes is exceeded, only the latest changes up to your specified number are retained (for subsequent method source comparison, for example). If you anticipate that schema elements may be changed several times, consider setting this to a higher value. (No warning is raised if the number of changes within the patch version exceeds the specified number, so you may later find that the first source change is no longer retained.)
-
In the Forms Management Style combo box, select the forms management style that you require for your schema if you want a style other than the default multiple definitions and multiple translations style.
The default style provides the maximum flexibility at the cost of the greatest maintenance effort.
For more details, see "Forms Translation Styles", in Chapter 11.
-
Click the OK button. Alternatively, click the Cancel button to abandon your selections.
The specified schema is then displayed as a subschema of the selected superschema in the Schema Browser.
When you define a new schema, it automatically becomes the current, or selected, schema. The current schema and application are displayed at the right of the status line.

