Specifying the Class Name and Its Property Names
When you have defined the name of your HTML document, the next page of the HTML Wizard enables you to specify the class name, its superclass, and to change any JADE property names.
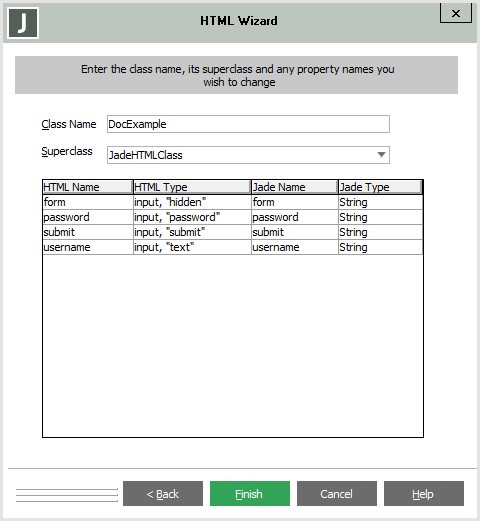
An example of the second page of the HTML Wizard is shown in the following image.
To specify your HTML document class and property name options
-
In the Class Name text box, specify the JADE class name that you require for the HTML document.
-
In the Superclass list box, select the JadeHTMLClass or one of its subclasses that you require for the superclass of your HTML document class. (You can add your HTML document class only as a subclass of class of
If you are defining the first HTML document for the schema, only the JadeHTMLClass class is displayed in this list box.
-
In the Jade Name column, change the name of each of the JADE properties that you require, by clicking in the appropriate cell and specifying the valid JADE property name that meets your requirements.
You can change values only in the Jade Name column.
The following table lists the HTML tags that cause a JADE property to be created and the property types to which the JADE types are converted.
HTML Type JADE Type Input, radio (true, if set) Boolean Input, checkbox (true, if set) Boolean Input, submit String Input, image String Input, reset String Input, button String Input, text String Input, password String Input, hidden String Input, file String Select String Select, multiple StringArray TextArea String JADE_TAG String / JadeHTMLClass Each HTML document can include any number of JADE_TAG tags but each tag must have a name attribute. If the name is not unique, the same value is set for the tags. JADE_TAG tags can have one of the following formats.
-
<JADE_TAG name=headerTag>
This form of the JADE_TAG tag creates a property of primitive type
-
<JADE_TAG name=includeHeader value=Header>
This form of the JADE_TAG tag creates a property of type JadeHTMLClass. The value attribute should resolve to a subclass of the
-
<JADE_TAG name=nameLabel _translate=translatableStringName>
This form of the JADE_TAG tag enables you to define translatable strings in the HTML document source.
For more details, see "JADE_TAG Tag Notes" and "Generating Data for JADE_TAG Tags Only", later in this section. See also "Using the HTML Wizard to Add an HTML Document", earlier in this section.
You can add additional attributes to the tags at run time, by calling the
-
-
Click the Finish button when you have finished specifying your HTML document. Alternatively, click the < Back button to redisplay the previous page or the Cancel button to abandon your selections.
When you click the Finish button, the class and all of its associated properties are created. The class is created as a subclass of
You can delete neither the created class nor any of its properties. An HTML document class is deleted only when its corresponding HTML document is deleted. (For details, see "Removing an HTML Document", later in this chapter.) However, you can add additional properties to the class.
These properties can be changed and deleted by using the standard change and delete operations.
To set up mutually exclusive radio (option) buttons, the name attribute must be the same and the value attributes must be different. (JADE generates properties based on the value attribute.) This applies only to radio buttons. For example, the following HTML fragment generates two Boolean properties, one called positive and one called negative. While it is possible to set these two properties in code, the Web browser displays only one as being selected (that is, the second property).
<input type=radio name=status value=positive>
<input type=radio name=status value=negative>

