Specifying Selective Options
The Selective sheet, shown in the following image, is displayed when you have selected the Selective Extract option button in the Extract Options sheet and you then click the Selective sheet.
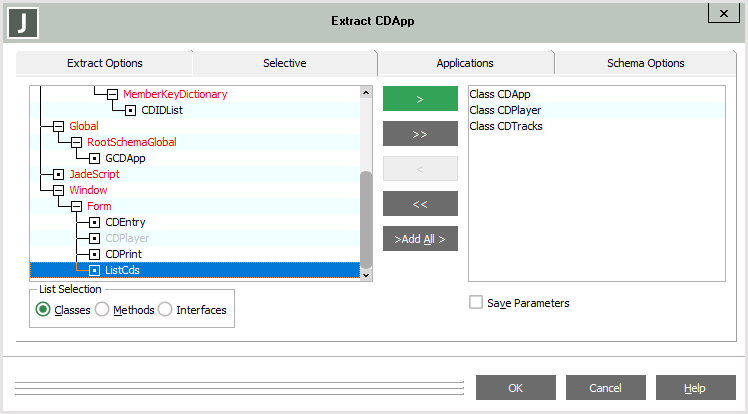
This sheet is also displayed when you click the Show Items on Selective Sheet button on the Changes sheet if you are extracting patch version changes only.
The Selective sheet enables you to specify selected classes, interfaces, and methods that are to be extracted from your schema. Selective options are enabled only when you extract the current schema; that is, you cannot specify these options for the extraction of multiple schemas.
A selective extract file includes the Web service exposure only if the Web service provider subclass of the JadeWebServiceProvider class is included in the parameter file. Although you do not have to perform a full extract of your schema, you do have to include the web service class in the partial extract file.
As a selective extract does not extract external databases, relational views, RPS mappings, or .NET exposures, you must extract these separately by using the appropriate Extract command if the current versions are not included in a full extract that is intended for a deployed application.
For details about the order in which files should be loaded into a deployed database, see "
You can resize the Extract dialog (by clicking on the form border and then using the mouse to drag the form to the required position when the cursor changes shape to a double-ended arrow), to enable you to display a greater number of classes, interfaces, and methods.
The hierarchy of all classes in your subschema is displayed by default, to enable you to make your selections.
To specify your selections
-
From the candidate objects list box at the left of the dialog, select one or more classes that you want to extract to a file.
If you want to extract only selected:
-
Methods for a class selected in the candidate objects list box, click the Methods option button in the List Selection group box. The methods for the selected class are then displayed in the list box.
-
Interfaces in the schema, click the Interfaces option button in the List Selection group box. The interfaces in the schema are then displayed in the list box.
Classes, interfaces, or methods that cannot be extracted from your schema (for example, the Object class that is part of the RootSchema and classes, interfaces, and methods that have already been selected for extraction) are disabled. The > button (move selected objects), the >> button (move all objects), and the >Add All > button (move all classes, interfaces, and methods) are disabled if you select a class or interface that is dimmed.
Use one of the following actions to select the required classes, interfaces, or methods.
-
Double-click on the appropriate class, interface, or method.
The selected class, interface, or method is then displayed in the selected objects list box at the right of the dialog. Repeat this action until all required classes, interfaces, and methods are displayed in the selected objects list box.
-
Click on a class, interface, or method that you want to extract and then click the > button to move the selected class, interface, or method to the selected objects list box.
Repeat this action until all required classes, interfaces, and methods are displayed in the selected objects list box.
-
To move all displayed classes, interfaces, or methods to the selected objects list box, click the >> button. All classes, interfaces, or methods are then displayed in the selected objects list box at the right of the dialog.
-
To move all classes, interfaces, and methods in the current schema to the selected objects list box, click the >Add All > button.
All classes, interfaces, and methods in the schema are then displayed in the selected objects list box at the right of the dialog. You can then selectively remove elements that you do not want to extract from the selected objects list box.
-
As the candidate objects list box is a multiple-selection list box, you can use the Shift or Ctrl key to select a group of classes, interfaces, or methods and then click the > button to move the selected objects to the selected objects list box.
When classes, interfaces, or methods have been selected for extraction and are displayed in the selected objects list box, they are disabled in the candidate objects list box.
You can locate a specific class, interface, or method in the candidate objects list box by pressing the F4 key or by right-clicking in the list box and selecting the Find command from the popup menu that is then displayed.
The Find Type dialog is then displayed, to enable you to specify or select the class that you want to locate.
-
-
You can move classes, interfaces, or methods selected for extract from the selected objects list box back to the candidate objects list box, to exclude them from the extract.
The actions required to do this are identical to those described in step 1, except that the < button is used to move single items and the << button to move all items selected for extract back to the candidate objects list box.
-
When all classes, interfaces, and methods that you want to extract from your schema are displayed in the selected objects list box on the right of the dialog, check the Save Parameters check box if you want your selected classes, interfaces, and class methods to be saved to a parameter file.
A parameter file can be reused for subsequent schema extracts, to enable you to extract the same classes, interfaces, and class methods for any extract that is performed with this option selected, until you change the parameter text file. By default, the selections that you make are not saved in a parameter file.
When you click the OK button, the common File dialog is then displayed, to enable you to select the location and name of your parameter file. By default, the file location is your JADE working directory and the file name is the schema name with an .unl extension; for example:
FaultsSchema.unl
-
If you want to specify the applications in the schema (if any) that are to be included in the extract, click the Applications sheet from the Extract Options group box. The Applications sheet is then displayed. By default, only the current application is selected.
If you want all applications in the current schema to be extracted, select all of the applications in the list and then click the OK button to confirm your selections. Alternatively, click the Cancel button to abandon the extract.

