Using the TimeStamp Sheet
Use the TimeStamp sheet of the Report Formats dialog to change the default report formats for your timestamp fields. Timestamps are variables made from a concatenation of date and time values. In JADE, they are mainly used to flag the precise time that objects are created.
When entering separator text for long or short date formats and time formats in any of the controls in this dialog, you cannot use more than three characters as separator text. If the separator text contains any of the characters d, M, y, g, h, H, m, s, or t, they are removed. The apostrophe character (’) is not displayed as such when used as a separator.
To change the default report formats for timestamp fields
-
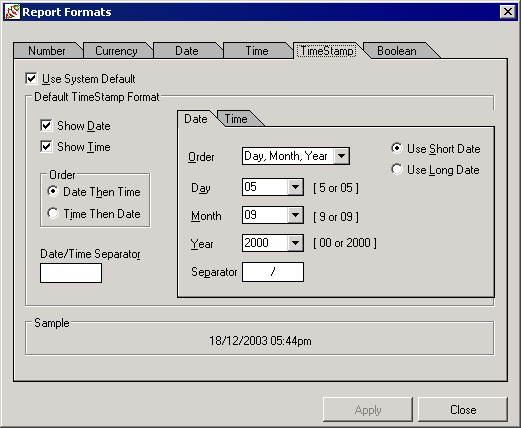
Click the TimeStamp tab of the Report Formats dialog. The TimeStamp sheet, shown in the following image, is then displayed.

Two further sheets on this dialog enable you to specify the timestamp format of dates and times. These sheets are enabled when the corresponding Show Date and Show Time check boxes are checked. The Date sheet is selected by default, as shown in the previous image.
-
The Use System Default check box is checked by default. If you make any changes to the controls on this dialog, the Use System Default check box automatically unchecks itself, indicating that the system defaults set by the configuration application are no longer being used. Alternatively, to begin making your changes, you can manually uncheck this check box. To revert to the system default values at any time during the report design process, you can check the Use System Default check box.
The Sample group box at the bottom of the sheet displays a sample of the selected format.
-
To print only the time portion of the timestamp, uncheck the Show Date check box.
By default, this check box is checked, indicating that the date portion and the time portion of the timestamp are printed. When this check box is checked, the Date sheet on this dialog is enabled to further specify the default date format.
-
To print only the date portion of the timestamp, uncheck the Show Time check box.
By default, this check box is checked, indicating that the date portion and the time portion of the timestamp are printed. When this check box is checked, the Time sheet on this dialog is enabled to further specify the default time format.
-
To print the date portion of the timestamp in front of the time portion (for example, 09/02/2004 02:18), select the Date Then Time option button in the Order group box.
By default, this option button is selected, indicating that the date portion of the timestamp is printed in front of the time portion.
Alternatively, to print the time portion of the timestamp in front of the date portion (for example, 02:18 09/02/2004), select the Time Then Date option button.
This group box is enabled only when the Show Date and Show Time check boxes are checked.
-
In the Date/Time Separator text box, enter the character or characters that you want to use to separate the date portion from the time portion of the timestamp. The default value is a single space.
This text box is enabled only when the Show Date and Show Time check boxes are checked above.
-
To specify options for the default display of dates, click on the Date tab to display the Date sheet and then perform the following actions, if required.
-
If you want the date portion of the timestamp to use the short date format, select the Use Short Date option button. The short date format does not include the day name and does not separate the day, month, and year; for example, 0902200402:18.
-
If you want the date portion of the timestamp to use the long date format, select the Use Long Date option button. The long date format includes the day name; for example, Fri/09/02/200402:18. The default value is Use Short Date.
-
In the Order list box, select how you want the date order printed; that is, the sequence of day, month, and year. The default value is Day, Month, Year.
-
In the Separator text box (visible only if you selected the Use Short Date option button), enter the character that you want to separate the numbers of your short date format.
-
In the Day Separator text box (visible only if you selected the Use Long Date option button), enter the character that you want to separate the day portion from the date portion of the timestamp. By default, there is no separator.
-
In the Date Separator text box (visible only if you selected the Use Long Date option button), enter the character that you want to separate the date portion from the time portion of the timestamp. By default, there is no separator.
-
In the Day Name list box (visible only if you selected the Use Long Date option button), select the way in which you want the day of the week printed. Select the full day name or the day name abbreviated to the first three letters of the day name; for example, Wed for Wednesday. By default, the abbreviated day name is printed.
-
In the Day list box, select the way in which you want the day number printed when the day number is less than 10. Select the option to print the leading zero (0) or not to print the leading zero. By default, the leading zero is printed; for example, 05.
-
In the Day Separator text box (visible only if you selected the Use Long Date option button), enter the character that you want to separate the day value from the month value in the date portion of the timestamp. The default value is the slash character (/).
-
In the Month list box, select the way in which you want the month number printed when the month number is less than 10. Select the option to print the leading zero (0) or not to print the leading zero.
By default, the leading zero is printed; for example, 09.
-
In the Date Separator text box (visible only if you have selected the Use Long Date option button), enter the character that you want to separate the month value from the year value in the date portion of the timestamp. The default value is the slash character (/).
-
In the Year list box, select the way in which you want the year printed.
Select the four-digit format or the two-digit format. By default, the four-digit format is printed; for example, 2004.
-
-
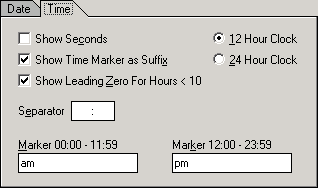
To specify options for the default display of the time portion of the timestamp, click on the Time tab to display the Time sheet. The Time sheet, shown in the following image, is then displayed.

-
the Time sheet, perform the following actions, if required.
-
If you want your report times to be printed in 12-hour clock format, select the 12 Hour Clock option button or select the 24 Hour Clock option button if you want your report times to be printed in 24-hour clock format. The default value is 12 Hour Clock.
-
If you want to include seconds in your printed times, check the Show Seconds check box. By default, this check box is unchecked, indicating that seconds are not printed.
-
If you want the time marker to be printed as a prefix to the time value (for example, pm12:06), uncheck the Show Time Marker as Suffix check box.
For the 12-hour clock format, the default time markers are am and pm. You can change these by using the Marker text boxes, described later in this procedure. By default, the Show Time Marker as Suffix check box is checked, indicating that the time marker is printed as a suffix to the time value.
-
If you want to suppress printing of the leading zero (0) when the hour value is less than 10, uncheck the Show Leading Zero for Hours < 10 check box. By default, this check box is checked, indicating that the leading zero is printed when the hour value is less than 10; for example, 09:06pm.
-
In the Separator text box, enter the character that you want to separate the hours and minutes (and seconds, if the Show Seconds check box is checked) of your default time format. The default value is a colon character (:).
-
In the Marker text boxes, enter time markers to indicate pre-noon and post-noon times.
If you selected the 12 Hour Clock option button, there are two Marker text boxes for pre-noon and post-noon times, respectively. The default markers are am and pm. If you want to create your own default markers, enter up to 30 characters in the Marker text box.
If you selected the 24 Hour Clock option button, only one Marker text box is displayed. If you want a marker to be printed against the times in your report, enter up to 30 characters in the Marker text box. By default, there is no marker for the 24 Hour Clock option.
-
-
Click another tab if you want to make changes on other sheets of the Report Formats dialog.
-
Click the Apply button to apply the changes you have made or click the Close button to close the Report Formats dialog.
To save the recent changes when you close the dialog, you must click the Apply button immediately prior to closing the dialog. To abandon any changes that you have made but not yet applied, do not click the Apply button immediately prior to clicking the Close button.