Using the Page Sheet
Use the Page sheet of the Report Properties dialog to maintain the page options for your report.
The Page sheet provides options to change the size, orientation, margins, and copies of your report.
To change the page options for your report
-
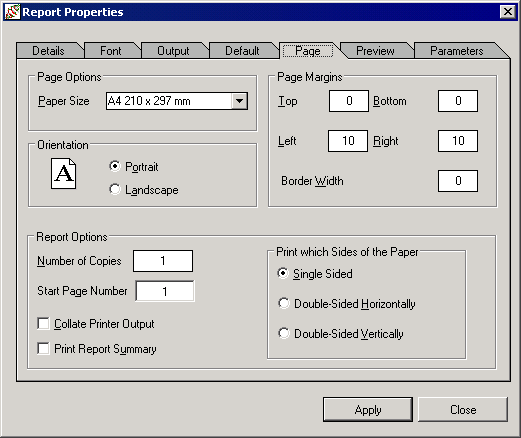
Click the Page tab of the Report Properties dialog.
The Page sheet, shown in the following image, is then displayed.

-
In the Paper Size list box, select a type and size for your report pages. The default value is A4 210x297 mm. Your report is then scaled to fit the page size that you have selected.
-
In the Orientation group box, select the page orientation. The default value is Portrait.
Select the Portrait option button to align the long edge of the page with the vertical or select the Landscape option button to align the long edge of the page with the horizontal, as shown by the sample page that is displayed.
-
In the Page Margins group box, change the default sizes (in millimeters) for your report margins, if required.
-
In the Top text box, enter the size of the margin between the top edge of the page and the printing. The default value is zero (0) millimeters.
-
In the Bottom text box, enter the size of the margin between the bottom edge of the page and the printing. The default value is zero (0) millimeters.
-
In the Left text box, enter the size of the margin between the left edge of the page and the printing. The default value is 10 millimeters.
-
In the Right text box, enter the size of the margin between the right edge of the page and the printing. The default value is 10 millimeters.
-
In the Border Width text box, enter the size in pixels of the border to be printed around the printed page. The default value is zero (0), indicating that no border is to be printed.
-
-
In the Report Options group box, change or set the following report options, if required.
-
In the Number of Copies text box, enter the number of copies of the report to be printed. The default value is 1.
-
In the Start Page Number text box, enter the starting page number for the report. The default value is 1.
-
Check the Collate Printer Output check box if the number of copies of the report requested is greater than 1 and you want the printer to collate the copies; that is, you want the printer to group the copies separately. By default, this check box is unchecked, indicating that output is not collated. This option applies only if your printer has collating capability.
-
Check the Print Report Summary check box if you want JADE Report Writer to print a summary of its activity after your report is printed. By default, this check box is unchecked, indicating that no summary is printed.
-
The default Single Sided option button indicates that your report is printed on one side of the paper.
-
Select the Double-Sided Horizontally option button if you want your report printed on both sides of the paper in landscape orientation. This option applies only if your printer has double-sided (duplex) printing capability.
-
Select the Double-Sided Vertically option button if you want your report printed on both sides of the paper in portrait orientation. This option applies only if your printer has double-sided (duplex) printing capability.
-
-
Click another tab if you want to make changes on other sheets of the Report Properties dialog.
-
Click the Apply button to apply the changes you have made or click the Close button to close the Report Properties dialog.
To save the recent changes when you close the dialog, you must click the Apply button immediately prior to closing the dialog. To abandon any changes that you have made but not yet applied, do not click the Apply button immediately prior to clicking the Close button.