Using the Font Sheet
The Font sheet of the Field Properties dialog is displayed when you click the Font tab. (The Font tab is not visible for the properties of a picture field). Use the Font sheet to change the font or typeface of the text in your report field.
Text fonts have system default values but you can set your own report-wide font default values by using the Report Properties dialog, if required. (For details about setting font defaults, see "Setting Report Properties" under "Using Administrative Functions", earlier in this chapter.) Use the Font sheet to override the defaults for the current field.
You can also set the font properties for the current field, by using the Font Tools toolbar.
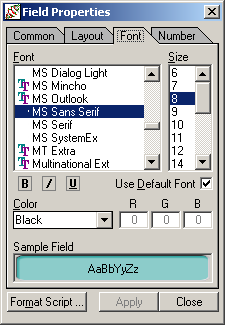
An example of the Font sheet is shown in the following image.
To change the properties on the Font sheet of the Field Properties dialog
-
In the Font list box, select a font.
-
In the Size list box, select a point size for your font.
-
Click one or more of the following buttons to change the default font style.
-
The B button toggles the bold style on or off
-
The I button toggles the italic style on or off
-
The U button toggles the underline style on or off
-
-
In the Color list box, select a color to apply to your default font.
If you select the Custom color, the common Color dialog is displayed to enable you to select or define a custom color. When you have made your selection, click the OK button to apply the selected color or click the Cancel button to close the Color dialog without making any changes.
The RGB (Red, Green, and Blue color scheme) color values that relate to the selected color are displayed to the right of the Color list box.
-
Check the Use Default Font check box to reset all font default values to the default values.
The Use Default Font check box is checked by default. If you make any changes to the font settings on this dialog, the Use System Default check box automatically unchecks itself, indicating that the report font defaults are no longer being used. Alternatively, to begin making your changes, you can manually uncheck this check box.
-
Click another tab if you want to make changes on other sheets of the Field Properties dialog.
-
Click the Apply button to apply the changes you have made or click the Close button to close the Report Properties dialog.
To save the recent changes when you close the dialog, you must click the Apply button immediately prior to closing the dialog. To abandon any changes that you have made but not yet applied, do not click the Apply button immediately prior to clicking the Close button.

