Starting a Report from Scratch
Start a new report from the Welcome dialog or from the New Report command on the File menu of the JADE Report Designer window. By default, the Welcome dialog is displayed when you initiate the JADE Report Writer Designer application. However, you can disable the Welcome dialog, in which case you start a new report using the New Report command.
To create a new report from the Welcome dialog
-
Start the JADE Report Writer Designer application.
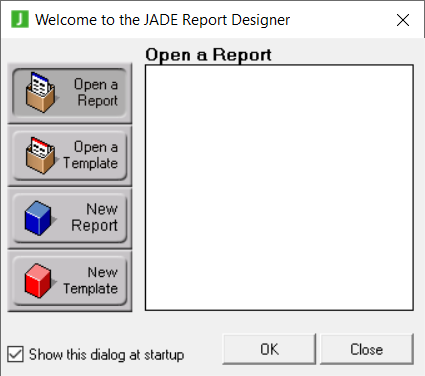
The Welcome to the JADE Report Designer dialog, shown in the following image, is then displayed.

-
Click the New Report button.
You can also create a new template by clicking the New Template button. For details about creating a new template, see "Opening a Template", later in this section.
-
If you do not want the Welcome dialog displayed at start-up, uncheck the Show this dialog at startup check box. The Welcome dialog is then no longer displayed when you next start up the JADE Report Writer Designer application.
If you decide to bypass the Welcome dialog when you next start up, you can start a new report from within the JADE Report Writer Designer application, as described later in this subsection. You can choose to display the Welcome dialog again on start-up by using the User Preferences command from within the JADE Report Writer Designer application. For details, see "Setting User Preferences" under "Designing a Report", later in this chapter.
The Select Collections and Joins to Report on dialog, described later in this subsection, is then displayed.
To create a report from within the JADE Report Writer Designer application
-
To initiate a new report, perform one of the following actions.
-
Select the New Report command from the File menu
-
Press Ctrl+N
-
Click the New Report toolbar button
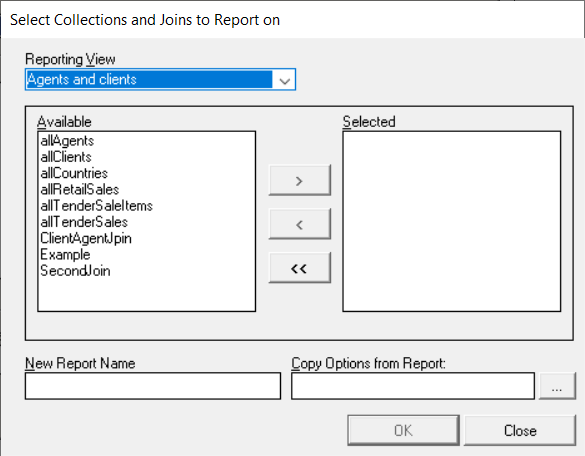
The Select Collections and Joins to Report on dialog, shown in the following image, is then displayed.

-
-
In the Reporting View list box, select a reporting view on which to base your report.
The available collections and joins for the selected reporting view are then displayed in the Available list box. Your report must be based on at least one root collection or report join. The report collections or joins that you select are used to access all of the data that is required in the report.
Reporting views and associated collection paths are created in the configuration phase of the JADE Report Writer. For details, see "Configuring the JADE Report Writer", in Chapter 3.
-
Select or remove collections or joins in one of the following ways.
-
Select a collection or join from the Available list box and then click the add (>) button, or double-click the collection or join.
The selected collection or join name is then displayed in the Selected list box.
If you selected a join name, the join name in the Available list box is disabled; that is, it is grayed out in the Available list box and you cannot select it there again.
A selected collection is not disabled, as you can create collection self-joins by selecting a collection more than once. The procedure to do this is described later in this subsection.
-
To remove a selected collection or join name, select it in the Selected list box and then click the remove (<) button, or double-click the collection or join.
The selected collection or join name is then removed from the Selected list box. The join name in the Available list box becomes enabled again; that is, you can select it.
-
To remove all selected collection and join names from the Selected list box, click the remove all (<<) button. All collections and joins are then removed from the Selected list box.
-
-
Enter your new report name in the New Report Name text box.
-
If you want to apply properties from a previously created report, enter the name of a report in the Copy Options from Report text box. All report properties, formats, and templates are copied from the specified report. This enables you to have a base report design that you can apply to all of your reports.
If you are unsure of your report name or location, click the Browse button (…). The Find Report dialog is then displayed, to enable you to select the appropriate report file. Use the Find Report dialog to select a report in the same way that you use the Open Report dialog to select the report to open. For details, see "Opening an Existing Report", later in this chapter. For details about setting report properties, see "Setting Report Properties", later in this chapter.
-
Click the OK button. A new report layout is then displayed, to enable you to begin designing your report.
Having specified the collections on which to report, you are then ready to start designing your report. For details, see "Designing a Report", later in this chapter.
To create self-joins
-
Select collections or joins as described in the above instruction.
-
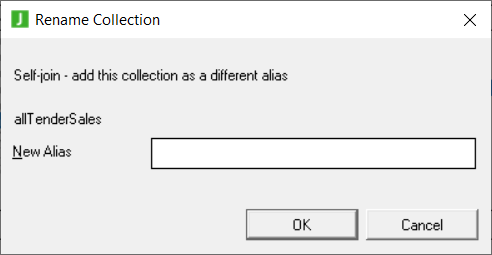
To create a self-join, while selecting collections on which to report in step 3 of the above instruction, select and add the same collection more than once to the Selected list box. The Rename Collection dialog, shown in the following image, is then displayed.

-
In the New Alias list box, enter a new alias name for this joined collection. The join alias name cannot be the same name as that of any existing collection or alias.
-
Click the OK button. Alternatively, click the Cancel button to abandon the join. The joined collection name is then displayed in the Selected list box of the Select Collections and Joins to Report on dialog.
Having specified the collections on which to report, you are then ready to start designing your report. For details, see "Designing a Report", later in this chapter.

