Changing the Section Properties using the Properties Command
To change section properties using the section properties popup menu
-
Select the Properties command from the section properties popup menu.
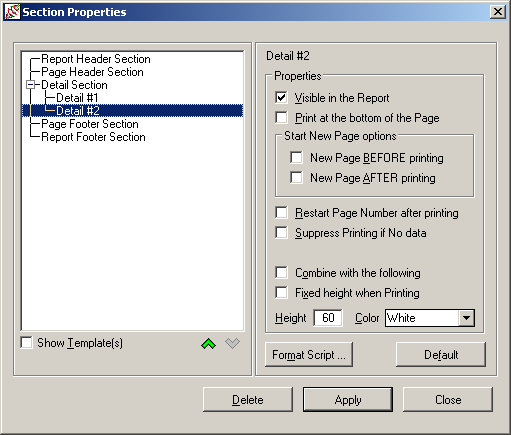
The Section Properties dialog, shown in the following image, is then displayed.

The section that has the focus is highlighted and the properties at the right of the dialog apply to that section. However, you can select another section from the list, if required. The pane at the right differs slightly from section to section. The type of section is displayed at the top of the pane; for example, Group Header Section.
-
If you do not want the current section printed, uncheck the Visible in the Report check box.
The section remains visible in your layout but the space is filled with cross-hatching (that is, it is grayed out). By default, all sections are visible in the report.
-
If you want the current section printed at the bottom of the page, check the Print at the bottom of the Page check box.
This check box is enabled only for Report Header, Detail, Group, and Report Footer sections. For these sections, the check box is not checked by default; that is, the sections are not printed at the bottom of the page. As the page footer is printed only at the bottom of the page, this check box is checked automatically for the Page Footer section and cannot be changed.
-
If you want the current section printed on a new page, check the New Page BEFORE Printing check box. This check box is enabled only for the following sections.
By default, the check box is not checked for these sections, indicating that the section is not printed automatically on a new page.
As the report header is always printed on a new page, this check box is checked automatically for the Report Header section and cannot be changed.
-
If you want to start a new page after printing this section, check the New Page AFTER Printing check box. This check box is enabled only for the following sections.
By default, the check box is not checked for these sections, indicating that a new page is not printed automatically after the section is printed.
As a new page is always started after printing a footer, this check box is checked automatically for the Page Footer section and the Report Footer section and cannot be changed.
-
If you want to start numbering pages at 1 after printing the current report section, check the Restart Page Number after printing check box.
By default, the check box is not checked, indicating that page numbering is not restarted after the section is printed.
-
If you do not want to print the current section if there is no data in the fields of this section, check the Suppress Printing if No data check box.
By default, the check box is not checked, indicating that the section is printed regardless of whether data is present.
-
If you do not want to print the page header section or page footer section on the first page of the report, select the Skip Page Header on first page or Skip Page Footer on first page check box. These check boxes are displayed only when the Page Header Section or Page Footer Section is selected.
By default, the check box is not checked, indicating that the page header or footer section is printed on the first page.
-
If you want to reprint the group header at the top of the next page, check the Reprint Group Header at top of page check box. This check box is visible only when you have selected a group header in the pane at the left.
By default, the check box is not checked, indicating that the group header is not printed at the top of the next page.
-
If you want to position the section that follows the current section so that it is printed horizontally adjacent to this section (that is, the two sections are combined), check the Combine with the following check box.
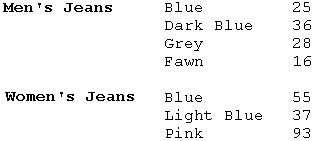
Typically, you would use this check box when you have a group header at the left of your page and you want detail to be printed so that it is indented to the right of the group header rather than directly below it.
In the following example, the group header is the type of garment and the stock detail section is printed to the right of it rather than below it.

By default, the check box is not checked, indicating that the section that follows the current section is printed below this section.
-
If you want to restrict the height of the section to the value that you enter in the Height text box, check the Fixed Height when Printing check box.
This check box is checked by default for all sections except the Page Footer section, indicating that the section is expanded if the detail does not fit. By default, the Page Footer is of a fixed height.
-
To change the default height for a section, enter the number of pixels in the Height text box. (The maximum number of pixels is 9999 and the default value is 60 pixels.)
If you do not check the Fixed Height when Printing check box to restrict the height of the section (described in step 10 of this instruction), the JADE Report Writer may expand a section beyond the value entered in this field if the detail does not fit when printing.
A pixel is a picture element. It is the smallest element that can be displayed on the screen.
-
Change the background color of a section by selecting a color in the Color list box.
If you select the Custom color, the common Color dialog is displayed to enable you to select or define a custom color. When you have made your selection, click the OK button to apply the selected color or click the Cancel button to close the Color dialog without making any changes. By default, each section has a white background.
-
If you want the display to show the attached templates, check the Show Template(s) check box. When the display of templates is selected, you can display template properties by selecting a template in the pane at the left but you cannot change the properties of that template. By default, the check box is not checked, indicating that the attached templates are not shown.
-
Use the up and down arrows below the display to relocate group sections or frames within any section, if required. Creating and maintaining group sections is described in "Creating Groups" under "Using the Detail Functions", later in this chapter.
-
If you want to return all of the settings for a section to the default values, click the Default button.
-
If you want to delete the currently selected group section or frame, click the Delete button. (The Delete button is displayed only if you have selected to view the properties of a group section. The Delete button is also displayed if there is more than one frame defined in a section and one of those frames is selected.)
If you are deleting a group section, a confirmation dialog is then displayed. Click the Yes button to delete the section or click the No button to abandon the deletion. Frames are deleted immediately.
-
Click the Format Script button to define section format scripts. If a format script exists for the current section, the button is blue. If no script exists, the button is gray. For more details, see "Changing the Section Properties using a Format Script", later in this subsection.
-
Click the Apply button to apply your section property changes and then click the Close button if you do not want to make more changes. To save the recent changes when you close the dialog, you must click the Apply button immediately prior to closing the dialog. To abandon any changes that you have made but not yet applied, do not click the Apply button immediately prior to clicking the Close button.