Selecting the Features for Your View
In JADE, a feature is something that describes an object or some operation that an object performs. Features are the properties and methods associated with a type or class.
When you have selected the types for your view, you can then select the features (that is, the properties and methods) for each type.
To display all of the features for a type, perform one of the following actions
-
Click a type in the Selected Types pane.
-
If you want to display methods that have primitive parameters for that type (methods that have no parameters are always shown), check the box in the Show Methods column of the Select Types table.
Only methods that return a primitive value can be used as Method fields in the Report Writer Designer.
-
Select the type in the Types list box in the lower left pane.
The features (properties and methods) of the selected type are then displayed in the Features pane, as shown in the following image.

You can then select the features that you require for your reporting view from the features list. Your selected features are displayed in the Selected Features pane at the lower right of the window.
All public and read-only properties are shown in alphabetical name order, followed by methods in alphabetical name order. Only those methods that can be reported on are shown; that is, methods that are public or read-only, non-abstract, and have a return type.
The type of a feature (corresponding to its Data Type listed in the table in the Selected Features pane) is indicated by a graphical icon displayed to the left of the feature. These icons are used throughout the JADE Report Writer applications. For details, see "Using the Catalog of Available Fields Dialog", in Chapter 4.
To select a feature to include in the Selected Features pane, perform one of the following actions
-
Click the feature that you want to include and then click the right pointing arrow.
-
Double-click the feature that you want to include.
-
Click and drag the feature across to the Selected Features pane in the upper right of the sheet.
-
Click the feature, right-click within the pane and then select the Select command on the popup menu that is displayed.
The selected feature is then included in the Selected Features pane.
You can select all of the features from a type.
To select a group of features to include in the Selected Features pane
-
To select a group of consecutive features in the Features pane, click the first feature in the group, hold down the Shift key, and then click the last feature in the group.
To select a group of non-consecutive features in the Features pane, click the first feature of the group, hold down the Ctrl key, and then click each subsequent feature that you want to include in the view.
-
Perform one of the following actions.
-
Click the right pointing arrow.
-
Drag the features across to the Selected Features pane at the lower left of the sheet.
-
Right-click and then select the Select command on the popup menu that is displayed.
-
The selected features are then included in the Selected Features pane.
To select all the features for a selected type or class, perform one of the following actions
-
Click the down arrow in the Selected Types pane at the upper right of the sheet.
-
Right-click within the pane and then select the Select ALL Features command in the displayed popup menu.
All of the features for the selected type are then listed in the Selected Features pane, including the features inherited from the superclass.
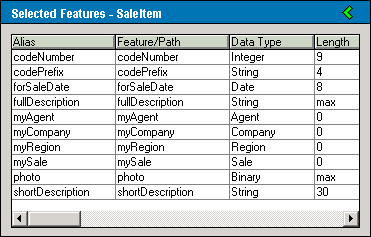
The following image shows the Selected Features pane after selecting all of the features from the SaleItem class.
The default value in the Alias column is the feature name. However, you can change an alias to a more meaningful name, if required.
To change the alias for a selected feature in the Selected Features pane
-
Click the Alias cell or select the Rename command from the Edit menu. An entry box is then displayed around the Alias cell.
-
Type your new alias over the displayed alias.
-
Press the Enter key or the Tab key, or click outside the current pane, to complete the alias change.
The alias of the selected feature is then changed to your new value. Invalid characters in the alias (for example, punctuation marks that are not allowed in report scripts) are automatically removed. You can change the length of a feature in your view if, for example, you know that the length is usually less than the length specified in the database.
To change the feature or path for a selected alias in the Selected Features pane
-
Double-click the Feature/Path cell to be changed. An entry box is then displayed around the Feature/Path cell.
-
Type your new feature or path name over the displayed feature.
-
Press the Enter key or the Tab key, or click outside the current pane, to complete the feature or path change.
If the new feature or path name is valid and its type is the same as the old feature or path, the name is changed.
To change the length of a selected property feature in the Selected Features pane
-
Click the Length cell (for data types that are Integer, String, Decimal, or Binary values). An entry box is then displayed around the Length cell.
-
Type your new length over the displayed length (the maximum value is 9999).
-
Click outside the current pane to complete the change.
The length of the selected feature is then changed.

