Date Sheet
Use the Date sheet of the System Formats dialog to set the default formats for date fields.
When entering separator text for long or short date formats in any of the controls in this dialog, you cannot use more than three characters as separator text. If the separator text contains any of the characters d, M, y, g, h, H, m, s, or t, they are removed.
The apostrophe character (’) is not displayed as such when used as a separator.
To set the default formats for date fields
-
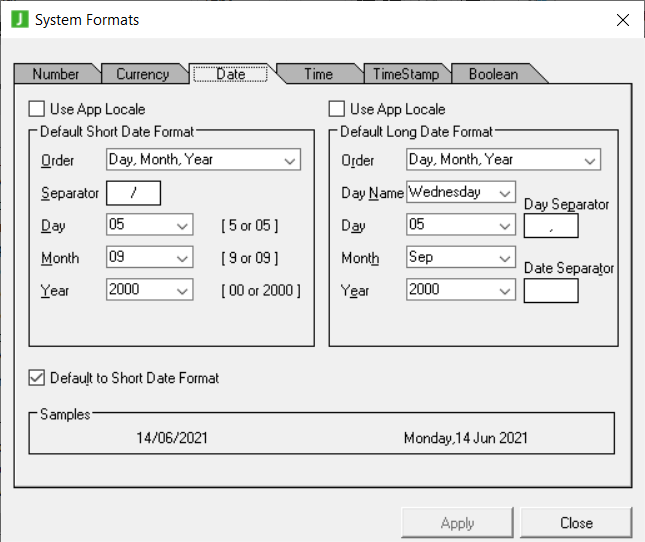
Click the Date tab of the System Formats dialog.
The Date sheet, shown in the following image, is then displayed.

-
In the Order list box (Default Short Date Format group box or the Default Long Date Format group box), select how you want the date order printed; that is, the sequence of day, month, and year. The default value is Day, Month, Year.
-
In the Separator text box of the Default Short Date Format group box, enter the character that you want to use to separate the numbers of your short date format. The default value is the slash character (/).
-
In the Day Name list box of the Default Long Date Format group box, select the way in which you want the day of the week printed.
Select the full day name or the day name abbreviated to the first three letters of the day name; for example, Wed for Wednesday. By default, the full day name is printed.
-
In the Day combo box (Default Short Date Format group box or Default Long Date Format group box), select the way in which you want the day number printed when the day number is less than 10.
Select the option to print the leading zero (0) or not to print the leading zero. By default, the leading zero is printed; for example, 05.
-
In the Day Separator text box of the Default Long Date Format group box, enter the character or characters that you want to use to separate the day name from the remainder of the date in your printed dates.
The usual preferences are a comma character (,) or a comma followed by a space (, ).
The default value is a single-character comma (shown in the sample in the previous image). If you do not enter a separator character, there is always a space between the day name and the remainder of the date. The maximum number of separator characters is three.
-
In the Month combo box of the Default Short Date Format group box, select the way in which you want the month number printed when the month number is less than 10.
Select the option to print the leading zero (0) or not to print the leading zero. By default, the leading zero is printed; for example, 09.
-
In the Month list box of the Default Long Date Format group box, select the way in which you want the month printed in the long date format.
The month portion of the date can be printed as the full name of the month (for example, September), the abbreviated name of the month (for example, Sep), the number of the month with a leading zero for months less than ten (09), or the month number alone (9).
By default, the abbreviated name of the month is printed; for example, Sep.
-
In the Year combo box (in the Default Short Date Format group box or the Default Long Date Format group box), select the way in which you want the year printed. Select the four-digit format or the two-digit format. By default, the four-digit format is printed; for example, 2004.
-
In the Date Separator text box of the Default Long Date Format group box, enter the character or characters that you want to use to separate the day, month, and year parts of your printed dates as an alternative to a space.
If no character is entered in this text box, a space is used. The character that you enter replaces the space; for example, if you enter a comma character (,), the result is that a comma character alone is printed between the parts of the date.
By default, there is no entry; that is, one space is printed between the day, month, and year (shown in the sample in the previous image). The maximum number of separator characters is three.
-
Uncheck the Default to Short Date Format check box if you want dates printed in long date format in the JADE Report Writer Designer application. The Default to Short Date Format check box is checked, by default.
-
Click another tab if you want to make changes on the other sheets of the System Formats dialog.
-
Click the Apply button to apply the changes that you have made or click the Close button to close the System Formats dialog.
To save the recent changes when you close the dialog, you must click the Apply button immediately prior to closing the dialog. To abandon any changes that you have made but not yet applied, do not click the Apply button immediately prior to clicking the Close button.