Creating a New Reporting View
Use the New command from the View menu to create a new reporting view.
To create a new reporting view
-
Select the New command from the View menu.
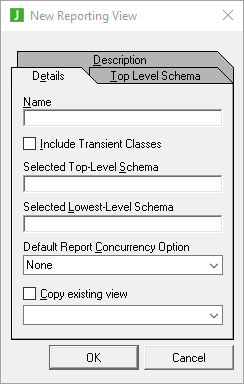
The New Reporting View dialog, shown in the following image, is displayed.

-
Specify the name of your reporting view in the Name text box (for example, ErewhonView). The maximum length for the name is 30 characters.
-
If you want to include transient classes in your view, check the Include Transient Classes check box.
By default, the Include Transient Classes check box is unchecked.
The transient classes option enables you to build complex queries by combining data into a composite transient class and then using the JADE Report Writer to report on the transient data. For more details, see "Reporting on Transient Classes", later in this chapter.
-
Click the Top Level Schema sheet tab or click once in the Selected Top-Level Schema text box.
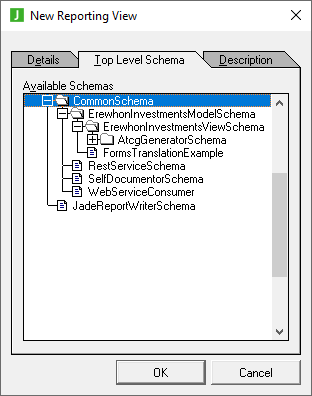
The Top Level Schema sheet, shown in the following image, is then displayed, to enable you to specify the highest-level schema in the schema hierarchy from which data is to be reported.

Select a schema from the Available Schemas list box and then click the Details sheet tab. The selected schema is then displayed in the Selected Top Level Schema text box.
-
Click once in the Selected Lowest-Level Schema text box. The Lowest Level Schema sheet is then displayed, to enable you to specify the lowest-level schema in the schema hierarchy from which data is to be reported.
Select a schema from the Available Schemas list box (for example, ErewhonInvestmentsViewSchema). The lowest‑level schema must be the same as or a subschema of the highest‑level schema. Click the Details sheet tab. The selected schema is then displayed in the Selected Lowest‑Level Schema text box.
-
Select a default concurrency strategy option for reports based on your reporting view from the Default Report Concurrency Option drop-down list box. The default setting for new views is None. For details about setting a concurrency strategy for reports, see "Using the Options Sheet" under "Query Options Command", in Chapter 4.
-
Click the Description tab. The Description sheet is then displayed.
In the Description text box, enter an optional description of your reporting view.
-
Click the OK button. Alternatively, click the Cancel button to abandon your selections.
The reporting view that is then created becomes the active view in the JADE Report Configuration window. You can now define the reporting view by selecting types and features for reporting.

