Loading Schemas using the Schema Load Utility
To initiate the JADE Schema Load utility
-
Ensure that you have a full backup of your database.
-
Select the Jade Loader program icon from your JADE program folder.
If a schema load is attempted when a reorganization is in progress (regardless of whether the reorganization progress dialog is displayed), the load fails. For details about reorganizing schemas, see "
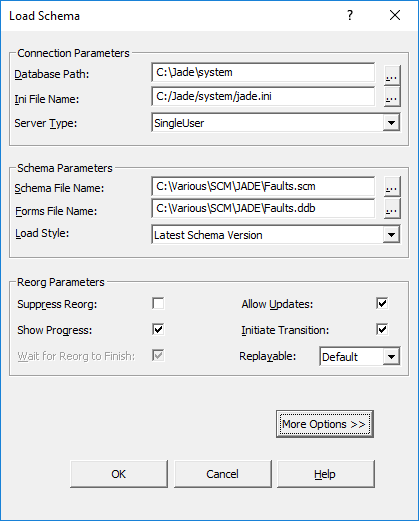
The Load Schema dialog, shown in the following image in an example of its initial form, is then displayed in the JADE Schema Load Utility window. An extended form of the dialog is displayed when you click the More Options >> button. For details, see "Specifying Additional Load Options", later in this document.

The controls are empty when the Schema Load utility is run for the first time. If the utility has been run previously, the values that were specified the last time the utility was run are displayed in the Connection Parameters group box controls and in the Schema File Name and Forms File Name text boxes. Other values are set to default values in the following steps of this instruction.
To load a JADE Report Writer file, specify the file name and appropriate suffix (for example, AllReports.rwa for a single extract file or MyRptView.rwv for a reporting view) in the Schema File Name text box.
-
In the Database Path text box, specify the path in which your JADE database files are located. The database path must exist. If you are unsure of your database directory, click the adjacent browse button (indicated by the … points of ellipsis symbol) to display the common Browse for Folder selection dialog that enables you to select the database path in which your user data is located.
-
In the Ini File Name text box, specify the name (and optionally the file path) of your JADE initialization file. The database path is assumed if you do not specify the file path. If you are unsure of your initialization file, click the adjacent browse button (indicated by the … points of ellipsis symbol) to display the common Choose File dialog that enables you to select the initialization file that is used.
-
In the Server Type combo box, select the mode in which you want to perform the schema load process. Select the multiUser value if you want to connect to a running server or the singleUser value if you want to connect in single user mode.
-
In the Schema File Name text box, specify the full path of the location of your schema (.scm) file. If you are unsure of your schema file directory or name, click the adjacent browse button (indicated by the … points of ellipsis symbol) to display the common Choose File dialog that enables you to select the schema file that you want to load.
If you are loading a partial file, this may be a .scm file or a .cls file for a class or interface extract. This can also be a multiple schema file (.mul) for loading multiple schemas.
-
In the Forms File Name text box, specify the full path of the location of your form and data definition (.ddb
-
In the Load Style list box, select the load style, as follows.
-
The default Latest Schema Version value loads a new schema or loads the schema as the latest schema version (a new version will be created if required), and allows structural changes.
-
The Current Schema Version value loads the schema into the existing current schema version, which may potentially affect current runtime behavior. As structural changes are not allowed, the load will not proceed if structural changes are to be introduced.
If you are loading a schema file containing only method changes into a multiuser system, select this option, to ensure that no structural changes are attempted that would require a reorganization of the database and impact existing users. If a structural change is detected, the schema load returns an error.
As all JADE Report Writer files (that is, files with a suffix of rwv, rwo, rwf, rwu, rwr, and rwa) are loaded only into the current schema version, they should therefore be loaded after any database reorganization transition.
-
The Only Structural Versioning value loads only structural changes into the latest version and does not version methods or other non-structural entities. This may potentially affect current runtime behavior.
-
-
Check the Suppress Reorg check box if you want to prevent the reorganization of any loaded schemas that require reorganization on completion of the load process.
By default, any loaded schemas that require reorganization on completion of the load process are reorganized, regardless of whether they required reorganization prior to the load.
If control classes require reorganization or new Control subclasses are defined before loading a forms definition file, a reorganization will be initiated before the forms definition file is loaded. In this case, you must load the Relational Population Service (RPS) .ddbx file, if any, before the reorganization, to keep the RPS mappings up-to-date with the schema changes. (When extracting a schema with an RPS mapping and the DDX format style is selected, a separate .ddbx file is produced as for a DDB extract but the file contents are in XML format.)
After the reorganization, the .ddb forms definition file is loaded as normal, to complete the changes.
If such a reorganization is required and you check this control, the forms load process will raise an exception.
-
If you are running in multiuser mode and you do not want to allow other users to continue development and update the database while the reorganization is in progress, uncheck the Allow Updates check box. (The Initiate Transition check box is then checked if it was unchecked and it is disabled.)
If updates are disabled while the reorganization is in progress, the reorganization must initiate the transition. Any error occurring during the reorganization results in the reorganization being aborted; that is, the reorganization cannot be restarted. For details, see "
As it is not possible for other applications to update the database in single user mode, this control is unchecked and disabled if SingleUser is selected in the Server Type combo box.
In multiuser mode, the Allow updates check box is checked by default, to allow updates to proceed before the reorganization transition is initiated; for example, other users can still modify (that is, edit and compile) methods in the development environment.
-
If you do not want the reorganization progress dialog displayed during the reorganization, uncheck the Show Progress check box.
When this is checked (the default value), you can monitor the progress of the reorganization and you can cancel the reorganization at any time.
-
If you do not want the transition to be initiated for any reorganization, uncheck the Initiate Transition check box, to suspend the reorganization transition. This check box is checked and disabled if you unchecked the Allow Updates check box in step 10 of this instruction.
For details, see "
-
If you want to wait until the reorganization is complete, check the Wait for Reorg to Finish check box. As the load process in single user mode must wait for any reorganization to complete, this control is checked and enabled if SingleUser is selected in the Server Type combo box.
By default, this check box is not checked. In multiuser mode, you can exit from the JADE Schema Load utility and the reorganization continues.
-
If archival recovery is enabled (that is, the
Select Default in the Replayable combo box if you want to perform a replayable reorganization only if the schemas are loaded into a primary database.
Select True if you want to perform a replayable reorganization of your JADE database when the schema is loaded. If archival recovery is not enabled, the reorganization cannot be replayed.
Select False if you do not want to perform a replayable reorganization of your JADE database when the schema is loaded.
-
To display and select additional, delta, and system parameters for your schema load, click the More Options >> button.
The extended Load Schema dialog is then displayed. For details, see "Specifying Additional Load Options", later in this document.

