Creating Classes from Tables
When you have specified your class and property name identifiers, the Define Classes sheet of the External Schema Wizard then enables you to define the classes that are to be created from relational database tables.
You can map multiple tables into one class.
An example of the Define Classes sheet of the External Schema Wizard is shown in the following image.
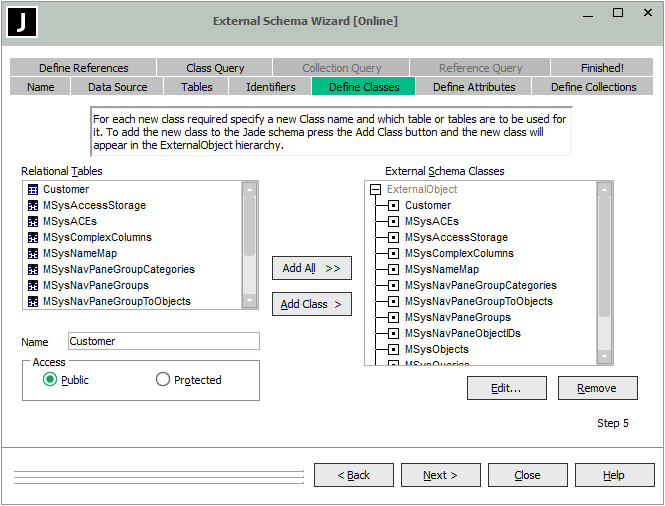
The Relational Tables list box alphabetically lists all tables specified in the Tables sheet for inclusion in the schema transformation.
A bitmap at the left of each table indicates the type of table; that is, whether it is a base table, a view, or a system table. By default, the first unused table in the list is selected. A table listed in black (that is, one that is not grayed) already has at least one defined class using that table.
The Name text box displays the class name to be generated for the selected relational table. If no relational table is selected, this text box is empty and the Add Class button is disabled.
The External Schema Classes list box lists all the classes defined for this external database schema; that is, all subclasses of the ExternalObject class for this external database.
To define classes from relational tables
-
In the Relational Tables list box, select one or more tables that are to be used in your class. (A class that is based on more than one table is called a join.)
As the selection in the Relational Tables list box automatically moves to the next unused table in the list, you can add a default class name for each table in the list by successively clicking the Add Class button. Alternatively, click the Add All button to initiate the creation of a new class for each relational table that is not used by a class.
-
A default class name is generated for the selected table or tables and is displayed in the Name text box. Specify a different name for the class, if required.
The name must be a valid class name that is unique to the ExternalObject class.
-
In the Access group box, select the appropriate option button to specify the type of access you require for the currently selected class; that is, protected or public. (The default access type is determined by the user profile.)
-
Click the Add Class button to add your class to the ExternalObject hierarchy and update the JADE database. The next unused table in the Relational Tables list box is then selected.
Alternatively, click the Add All button to initiate the creation of a new class for each relational table that is not used by a class.
-
To delete an existing class that you no longer require in your external database schema, in the External Schema Classes list box, select the class or classes that you want to delete, and then click the Remove button.
-
To edit the type of access of a class, select the class in the External Schema Classes list box that you want to change and then click the Edit button.
The Define Class dialog is then displayed. Controls and sheets that are not valid for the changing of an external database schema class are disabled. For details about using this dialog, see "
-
Click the Next > button when you have defined your external database schema classes. Alternatively, click the Close button to close the wizard.
When you click the Next > button, the External Schema Wizard then enables you to define attributes for a class.

