Controlling the Display in the Properties Dialog
When you have selected the design time properties for your control and then clicked the Input Type tab, the Input Type sheet, shown in the following image, is then displayed.
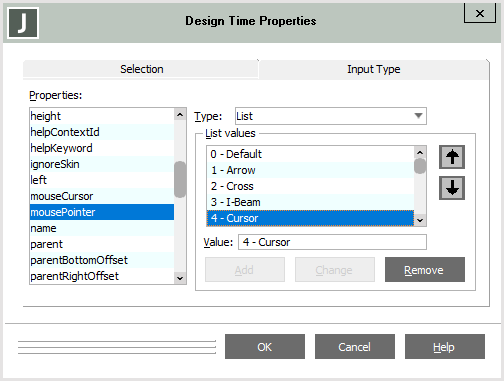
Use the Input Type sheet of the Design Time Properties dialog to specify how your selected properties are displayed in the Properties dialog during Painter sessions; for example, a color selection dialog or a combo box that allows selection from a set of values.
If input is to be by a custom-built dialog, or property page, set the input type to Via Property Page in the Type combo box. (See also the
For newly selected properties, the input type defaults to the most appropriate type; for example, a
To specify the input type of a property
-
Select the appropriate property in the Properties list box.
The input type of that property is then displayed in the Type combo box.
-
In the Type combo box, select the input type that you require for the property in the Properties dialog; for example, an OLE object or a picture.
JADE does not check that the selected input type is consistent with the property type; for example, you can select an Integer property for a
-
If the selected input type is List, use the Value text box to individually specify the values for that property. Each value that you specify for the property is then displayed in the List values list box, to enable you to select the values that you want to display in the Properties dialog.
-
To add a value to the selected design time property, specify the required value in the Value text box and then click the Add button to add your specified value to the List values list box. For details, see "Defining a List Value", in the following subsection.
-
To change a value, select the value in the List values list box and then change it to the appropriate value when it is then displayed in the Value text box. Click the Change button to amend the listed value.
When a selected value is displayed in the Value text box and the text box has focus, click the Remove button to remove the value.
-
Use the up or down arrow button to change the order of the listed values; for example, to display the second value after the fifth value, select the second value and then click the down arrow button three times.
-
When you have finished selecting your design time properties and specifying the property input types, click the OK button. Focus is then returned to the Define Class dialog.
Alternatively, click the Cancel button to abandon your selections.

