Reassigning Patch Numbers
The Summary of Patches window enables you to reassign a patch history of one or more change items from one patch number to another.
To reassign a patch history
-
In the table in the lower area of the Summary of Patches window, right-click on the change that you want to reassign to another patch number.
If you want to reassign a group or range of change items, use the Shift key or the Ctrl key to make multiple selections.
-
Select the Reassign command from the pop-up menu that is then displayed.
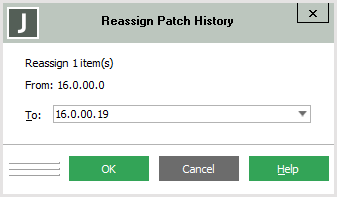
The Reassign Patch History dialog, shown in the following image, is then displayed.

The Reassign caption may not necessarily show the number of items you selected. It usually shows more than the number of items you selected because an entry in the Summary of Patches summary window usually has more than one history entry associated with it.
-
In the To combo box, specify or select the patch number to which the selected change item (or items) is reassigned. The patch control hook, which has the following syntax, is called for each entity that is to be moved.
entity-name, entity-type, 'M', entity-patch-number: user-patch-number:status
The entity-patch-number value is the current patch number of the entity being modified, and is zero (0) if it is new or unset. The user-patch-number value is the patch number that is currently assigned to the user.
The status value is N if the entity is being modified for the first time against the user’s patch number, O if the entity has been modified previously against the user’s patch number and the patch number is still open, or C if the entity has been modified previously against the users’ patch number and the patch number is closed.
-
Click the OK button. Alternatively, click the Cancel button to abandon the reassignment action.
For details about the Summary of Patches window, see "Displaying a Patch History Summary", earlier in this chapter.

