Use the extended Define References dialog, displayed when you select the Define Inverse button in the initial Define Reference dialog, to specify the inverse reference.
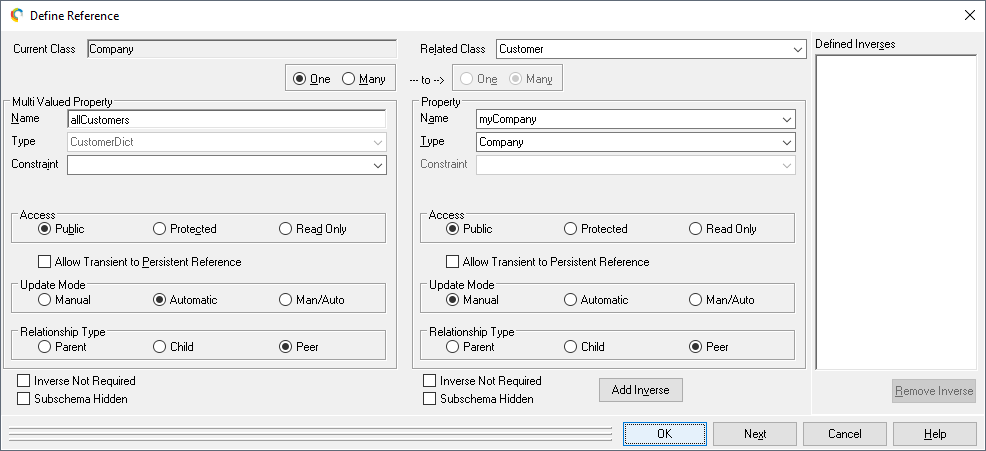
The values and options that you specified in the initial Define Reference dialog are displayed in the Property group box at the left of the extended dialog. The related class is also displayed, as well as existing inverse reference properties for the class.
The following is an example of the extended Define Reference dialog.
Values that cannot be altered are disabled. The default values that are set for an inverse reference property are:
If the property on the left side of the dialog is a reference to a collection, the One / Many option on the right side of the dialog is set to Many.
The Type list contains only those classes that are valid end points for the relationship.
To define an inverse reference property
Check the Subschema Hidden check box if you want to specify that the reference property is available only in the local schema; that is, it is not available for use in any subschemas. This check box is checked if you checked it on the initial form of the Define Reference dialog, documented under "Defining an Implicit Reference", earlier in this chapter. For details, see "subschemaHidden Option" under "Controlling the Use of Elements in Other Schemas", in Chapter 1.
Specify the cardinality of the relationship between the two classes, by selecting the One or the Many option for the class on the left side of the dialog. This may change the classes listed in the Type list on the right side of the dialog and the caption of the group box.
When you select a property on the left side of the dialog that is a reference to a collection, the Many option on the right side of the dialog is automatically set, the group box caption is displayed as Multi‑Valued Property, and the Type list is populated only with collection classes.
When you select the One option on the right side of the dialog, the caption is displayed as Property.
The Name combo box contains any properties in the related class that are valid end points for the relationship.
If you select an existing property from the Name list box, an inverse is added between the property in the current class and the property selected in the related class. If you specify a name for the property in the Name text box of the related class, a new property is added to the related class, and an inverse is added between the two properties.
If the required inverse property is not available for selection, you may be able to establish the inverse relationship from the other side (that is, define the required inverse property by opening the Define Reference dialog for the inverse property you require for the end‑point and then add the inverse relationship from that property).
If you added a new property in the Name list box, perform one of the following actions in the Type combo box.
Select the required type in the Type list. (The list displays only the types that are valid for the inverse.)
Specify the first character or the first few characters of the type in the text box, and then select the required type from the Type list. The selected type is then displayed in the Type combo box.
If a condition method has been defined for the class on which an automatic update mode is defined or a superclass of that class, select the condition that you require from the Constraint list box. This list box is enabled only for a property that has the Automatic option button selected in the Update Mode group box, and it does not contain any constraints if you have not defined any for that class or superclass or there are no conditions without parameters.
When the manual side of an inverse reference is set, the property on the automatic side of the reference is set only when the selected constraint is satisfied. For details about using condition constraints to maintain automatic inverse references when the specified conditions are satisfied, see "Defining and Compiling JADE Methods and Conditions" and "Adding Conditions to Classes or Primitive Types", earlier in this chapter.
In the Access group box, select the appropriate type of access if you do not want access to the property to be protected. The Protected option button is selected by default, so that the property can be accessed only by methods defined in the selected class and its subclasses. (A protected property is displayed in the Properties List of the Class Browser with a padlock icon to the left of the property.)
Select the Public option button if you want the property to be read and modified by any other method in the schema. (A property that has public access is displayed in the Properties List of the Class Browser with the public icon to the left of the property.)
Select the Read Only option button if you want the property to be read by other methods in the schema but not updated. (A read‑only property is displayed in the Properties List of the Class Browser with the read‑only icon to the left of the property.) If the property is of type StringArray, IntegerArray, or one of the other primitive array types, the access mode setting applies to the array object rather than to the elements within the array; that is, a setting of read‑only does not prevent array elements being added, deleted, or updated.
Check the Allow Transient to Persistent Reference check box if you want the current class (left side) or the related class (right side) to reference a persistent object from a transient object without its inverse being maintained. For new references, this check box on both the left and the right sides of the relationship is unchecked by default, indicating that transient to persistent references are not allowed.
When transient to persistent references are allowed, no inverses are updated when a persistent object is referenced from a transient object. This enables you to create transient structures that replicate persistent data for querying and analysis or for editing purposes without having to define multiple reference properties (one with an inverse and one without) and the associated code to maintain the appropriate reference based on the lifetimes of the objects involved. For example, given an inverse relationship between two classes A.myB inverseOf B.myA, this enables you to specify that where myB on a transient instance of A is updated to reference a persistent instance of B, myA on the persistent instance of B is not updated to reference the transient instance of A.
In the Update Mode group box on the right side of the dialog, select the type of update required for your property. (The update mode on the left side for the current class is set automatically; for example, setting Manual on the right side always results in the left side being Automatic unless the definition is for a condition.)
The Manual option specifies that the property is maintained by your JADE logic. If you select the Automatic option, the property is maintained by JADE whenever the property at the other end of the relationship is updated. Automatic references cannot be updated in user logic. The Manual / Automatic option specifies that either end of the relationship can be updated in user logic. The other side of the relationship is automatically maintained by JADE.
In the Relationship Type group box on the right side of the dialog, select the type of relationship required for your property. (The type of relationship on the left side for the current class is set automatically.)
A peer-to-peer relationship is an equivalent relationship between two objects. A parent-child relationship is a relationship in which the child object belongs to or is subsidiary to the parent object. When a parent object is deleted, any child objects are automatically deleted. The relationship is between instances of two classes. For example, if you select the Parent option in the Relationship Type group box on the right side of the dialog, the class displayed in the Related Class text box is the parent object in the relationship. (The class displayed in the Current Class list box is the child object.)
Check the Inverse Not Required check box for the current class or the related class if you want to specify that no exception is raised when:
No inverse is set during automatic maintenance because the type of the object is not compatible with any of the inverse references
No inverse is set during automatic maintenance because the constraint fails
The last inverse is removed as the result of a change to a property. For details about raising exceptions when specific conditions are not met, see "Defining and Compiling JADE Methods and Conditions", in Chapter 4. These check boxes are not checked, by default.
Check the Subschema Hidden check box for the current class or the related class if you want the inverse to be available only in the local schema. This check box is unchecked by default; that is, the inverse is available in subschemas. For details, see "subschemaHidden Option" under "Controlling the Use of Elements in Other Schemas", in Chapter 1.
Inverses that are subschema-hidden are not available for use in any subschemas. They cannot be referenced by subschema code, and they are not displayed in the Properties List in subschema Class Browsers.
If you want more than one inverse reference for the property on the left side of the dialog, click the Add Inverse button to add the specified inverse reference to the list of defined inverse references. (Conversely, you can remove an existing inverse reference by selecting the reference listed in the Defined Inverses list box and then clicking the Remove Inverse button.)
Click the OK button.
The specified property is then displayed in the Properties List of the Class Browser and the attributes that you defined for the property are displayed in the editor pane.