Click the Selection Criteria tab of the Profile Properties dialog.
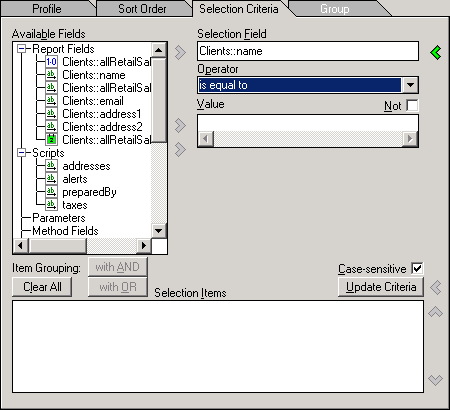
The Selection Criteria sheet, shown in the following diagram, is then displayed. (The Selection Criteria sheet is displayed by default when you select the Selection Criteria command from the Profile menu to display the Profile Properties dialog.)
Select a field to use as a selection field from the Available Fields list box at the left of the dialog. The following conditions apply.
-
You can select a report script only if it returns a Boolean value (that is, true or false).
You can use a report script that returns a Boolean to frame complex selection criteria that cannot be expressed in this dialog as an if statement that returns true when the selection criteria are met.
-
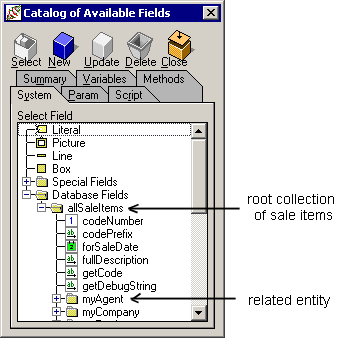
If you select a reference database field (that is, a database field that points to other database fields, as indicated by the plus (+) or minus (-) sign displayed to the left of the field), a list of subclasses is displayed under the Value caption, to enable you to specify an object class as a selection field. For details, see step 5 of this instruction.
-
If you select a reference database field that points to another object that is not a primitive type or a collection, you can also specify an object parameter as a selection field. See step 5 of this instruction for details.
The selected field is then highlighted and the right arrow is enabled.
The list of fields in the Available Fields list box is derived from the database fields that you specified in the reporting view during the configuration phase and the report fields that you defined in the current design. Available report scripts are only those that do not, directly or indirectly, reference a summary field. If you are creating profiles before starting to design your layout, only the database fields are displayed here. For details about configuring the JADE Report Writer, see Chapter 3, "Configuring the JADE Report Writer".
Click the right arrow to complete the selection. Alternatively, double-click the field to select it. The selected field is then displayed in the Selection Field text box at the right of the dialog. In the previous diagram, the client name field has been selected.
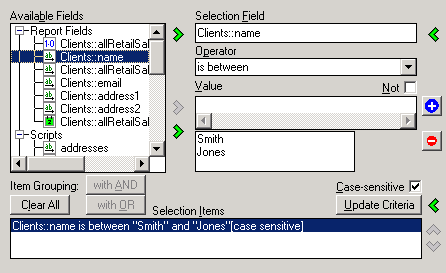
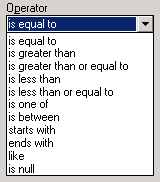
Select an operator from the Operator list box at the right of the dialog. The example in the following diagram shows the operator is equal to selected.
In the Value text box, enter a value with which your selection field is compared. To make this entry, perform one of the following actions.
-
Enter a value directly in the Value text box.
If you use the starts with, ends with, or like comparison operators with a string value, you can also use pattern matching. If you use the is one of or is between operator, you can also specify multiple values by adding them to the list of values. For details, see the instructions later in this section.
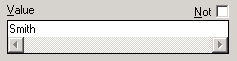
The following diagram shows an example in which the value Smith is entered.

In the examples in steps 3 through 5, the following selection formula has been built.
Clients::client name is equal to "Smith"
When this profile is applied, the report then prints detail items that apply only to clients named Smith.
If the operator is greater than or equal to is selected in step 4, the report is then produced for clients named Smith and all those higher alphabetically; for example, Stevens, Trubshaw, and Widmerpool.
-
Select another database field as a comparison item. Click a database field in the Available Fields list box and then click the right arrow that is displayed to the left of the Value text box. The selected database item is then displayed in the Value text box.
Only database items that are primitive types (such as String, Integer, and so on) can be used as comparison items. References and collections are not allowed. The primitive types must match (for example, String can be compared to String or Character), as for any other comparison. There are no other restrictions on the relationship between the two specified database items; for example, they do not need to be of the same object class.
-
Specify an object class as the comparison value. If you have specified a reference database field as a selection field, the valid operators are is kind of, is, and is empty. If you select the is kind of or is operators, a list of subclasses is displayed under the Value caption. Select an object class from the list box.
When objects are read from the specified reference field as the report is run, the selection criteria is met if the class of the object matches the selection. For an is kind of comparison, it is matched if the object class is the same as, or is a superclass of, the specified class. For an is comparison, it is matched if the object class is the same as the specified class.
If the database item is not a collection reference and is null, the is empty comparison is true. If the database item is a collection and has no entries (that is, it is of zero size), the is empty option is true.
-
Use a report parameter as the comparison value. Click a parameter in the Available Fields list box and then click the right arrow that is then displayed to the left of the Value box. The selected parameter item is then displayed in the Value text box.
You can compare a reference field against an object parameter, if required. The comparison operator can only be is equal to or is not equal to.
When selection criteria using parameters as comparison values are updated, the Value text box is disabled. To clear a parameter from the Value text box, click the left arrow that is displayed to the left of the Value box. This arrow is displayed only when a parameter is used as a comparison value. Clearing the Value text box enables you to enter a literal value, rather than another parameter.
For details about creating parameters, see "Using the Param Sheet" under "Using the Catalog of Available Fields Dialog", later in this chapter.
-
Select a script as the comparison value. The script must return the same value type as the selection field, which must be a database field followed by an operator.
Check the Not check box to negate your selection criterion formula. If you check this check box, the formula you have built as a selection criterion is negated. For example, if you formulate Clients::client name is equal to Smith and then check the Not check box, a report is produced that shows all clients except those named Smith when this profile is applied.
Check the Case-sensitive check box to make the comparison case-sensitive. Case-sensitive comparisons match the capitalization (case) of string fields as well as the characters. The Case-sensitive check box is enabled only for string fields and checked by default. Uncheck this option, to remove case-sensitivity.
Click the Update Criteria button to add your selection criterion formula to the Selection Items list box at the bottom of the sheet.
You can enter any number of selection criteria, by following steps 2 through 8 of this procedure for each selection criterion that you create. For example, you could add another formula, as follows.
Clients::email is null
If you then select the box at the right of the Not check box for this formula, you effectively refine your selections to those clients named Smith who do not have an e-mail address.
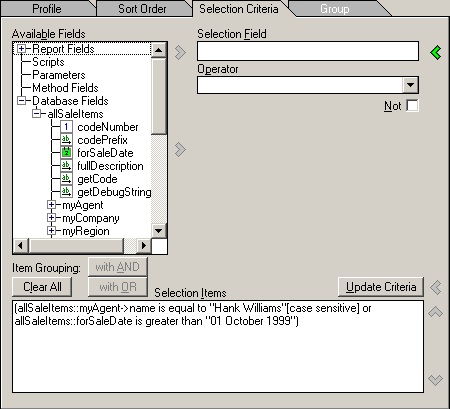
The following diagram shows the Selection Items list box as it would be displayed with these selection criteria applied.
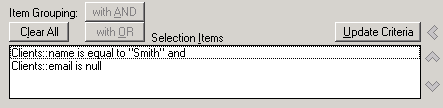
Selection criteria are first selected and then they are grouped. By default, multiple selection criteria are linked by a Boolean AND operator. This means that where you add more than one selection criterion, they must all apply. The example in the above diagram narrows the selection to all clients whose name is Smith and whose e-mail address is null (that is, they have no e-mail address). You can change the item grouping to use the Boolean logical OR operator, to group selection criteria in cases where one criterion or the other can apply.
-
Use a different operator to select the selection criteria that you want to link. Hold down the SHIFT or CTRL key while clicking to select more than one item. Include at least two items in your selection. The selection must be contiguous, or it will include unrelated existing conditions. To apply an AND operator or an OR operator, click on the with AND button or the with OR button, respectively.
Brackets then group the selected items and the logical operator is set to the new value. If the selected items were already grouped (indicated by brackets around them), the grouping remains unchanged and only the AND or OR operator is set to the new value.
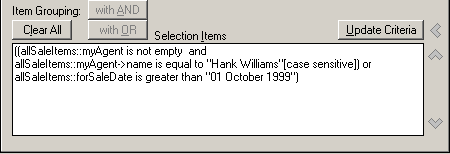
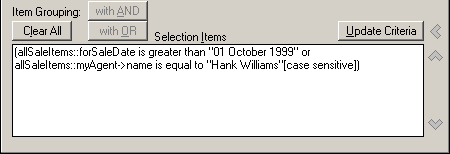
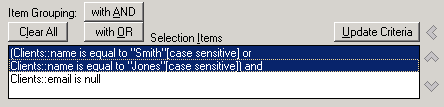
The example in the following diagram shows the Selection Items list box with two criteria selected and linked by a Boolean OR operator. In this example, the selection is narrowed to clients whose name is Smith or Jones and whose e-mail address is null. Note the brackets around the selected criteria, indicating that the criteria Smith OR Jones are grouped and will be applied before the email is null criterion.

-
To restart selection grouping, click the Clear All button. This removes all groupings and reverts to the default; that is, a list of selection items linked by AND. When an existing selection criterion is deleted, all existing grouping is automatically cleared.
When you have entered several selection items, you can change their order by selecting the item to be moved and clicking on the up arrow to move items up in the list or the down arrow to move them down the list. You can move selection items within the list, to make them contiguous for grouping. (See step 8 in this instruction for details.)
If you use grouped selection criteria, changing the order of these selection items invalidates these criteria. You can therefore move selection criteria only when there are no existing groups. To clear any existing groups, click the Clear All button.
Update a selection criterion in the Selection Items list box by double-clicking the entry, if required. You can change the values that are then redisplayed in the relevant fields to meet your requirements.
To delete an existing selection criterion, click once on the selection criterion in the Selection Items list box. The Remove Selected Item button, displayed as a left arrow to the upper right of the Selection Items list box, is then enabled, changing from gray to blue. Click this button to remove the selection criterion.
Click another tab if you want to make changes on other sheets of the Profile Properties dialog.
Click the Apply button to apply the additions or changes you have made or click the Close button to close the Profile Properties dialog. To save the recent additions or changes when you close the dialog, you must click the Apply button immediately prior to closing the dialog. To abandon any additions and changes that you have made but not yet applied, do not click the Apply button immediately prior to clicking the Close button.